
Did you know that a soot-coated chimney can block up to 40% of your oil lamp’s light? An oil lamp is more than just a source of illumination; it’s a reliable companion that demands consistent care to perform at its best. Proper maintenance is not a chore but a crucial ritual that guarantees a brighter, safer, and more efficient flame. This guide will walk you through the essential steps, from daily wick trimming to deep cleaning procedures, ensuring your lamp remains a steadfast beacon for years to come.


【Introduction to Oil Lamp Care】

Why Proper Maintenance Matters
An oil lamp is more than just a source of light; it is a steadfast companion against the encroaching dark, a small, defiant sun held in the palm of your hand. Like any trusted companion, it requires care. Proper maintenance is not merely a chore—it is the ritual that ensures this loyal servant continues to perform its duty, night after night, year after year. A well-kept lamp is a reliable beacon of warmth and safety, while a neglected one becomes a dim, smoky, and potentially dangerous object. By understanding and practicing regular care, you honor the simple, robust design of the lamp and guarantee its service when you need it most.
The Importance of Regular Cleaning
The grime of use is the enemy of clear, bright light. Consistent cleaning is the most fundamental act of lamp care, and its impact is measurable and profound.
- Soot Buildup Reduces Light Output: A dirty chimney, coated with a film of soot and carbon, can rob your lamp of its brilliance. This layer can block up to 40% of the light, forcing the flame to work harder for less illumination. A clean chimney ensures every bit of your lamp’s potential light is cast into the room.
- Proper Wick Trimming Extends Wick Life: A wick left to become misshapen and charred does not burn efficiently. It draws fuel poorly and creates excess smoke. By regularly trimming the wick to a flat, even edge, you promote complete combustion. This simple act can extend the functional life of a wick by three to five times, saving you resources and ensuring a cleaner burn.
- Regular Cleaning Prevents Chimney Cracking: The intense, localized heat of the flame creates significant thermal stress on the glass chimney. Any residue, such as oil smudges or soot, can create hot spots on the glass. These inconsistent temperatures weaken the structural integrity of the chimney over time, making it susceptible to cracking or shattering from the heat alone. A clean chimney heats evenly and safely.
Safety Benefits of Maintenance
Beyond efficiency and longevity, the most critical reason for maintaining your oil lamp is safety. A well-maintained lamp is a safe lamp; a neglected one is a hazard waiting in the shadows.
- Reduces Carbon Monoxide Risk: An improperly tuned lamp with a malformed wick or a clogged air intake does not achieve complete combustion. This incomplete burning process can produce carbon monoxide (CO), an odorless and poisonous gas. This is a particular concern for indoor use. A clean lamp with a properly trimmed wick burns its fuel cleanly, minimizing this invisible threat.
- Prevents Fuel Leaks and Fire Hazards: Checking and cleaning the font (the fuel reservoir) and its threads ensures a tight seal for the burner assembly. Dirt or damage here can lead to seepage of highly flammable lamp oil. Wiping up any spills and ensuring all components are clean and secure is your first defense against an uncontrolled fire.
- Maintains a Stable Flame: A flickering, sputtering flame is not just an annoyance; it is a sign of an unstable burn. This can be caused by a dirty wick, water in the fuel, or an obstructed air flow. Such a flame is more likely to produce sparks or soot and is less predictable. Regular maintenance ensures a steady, calm flame that stays where you put it.
To begin your maintenance journey with confidence, having the right tools makes all the difference. A high-quality maintenance kit, such as the 2025 Premium Lamp Care Set, provides all the specialized tools you need in one place. You can find this essential kit at: [Insert Product Link Here].
Essential Oil Lamp Components
Understanding Your Lamp’s Anatomy
To properly care for your oil lamp, you must first know its parts. Think of it as understanding the limbs and heart of a loyal animal; you cannot tend to it well if you do not know its form. Each component has a distinct role, and together, they create the steady, reassuring glow that pushes back the night. A keeper who knows their lamp is a keeper whose light will never fail.
Main Structural Parts
Your oil lamp is a simple yet precise instrument. Its core structure consists of four key parts that work in harmony.
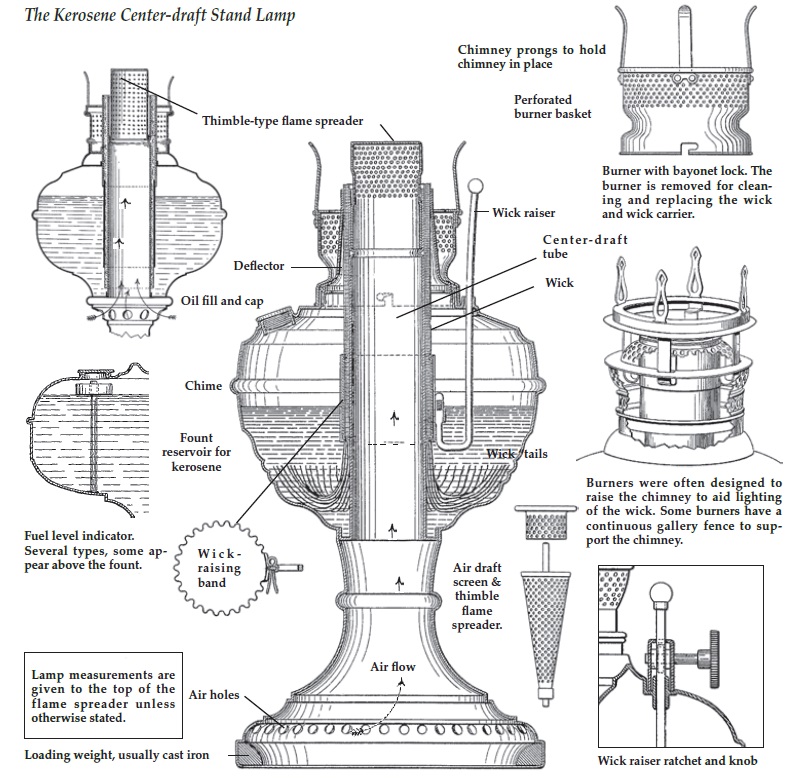
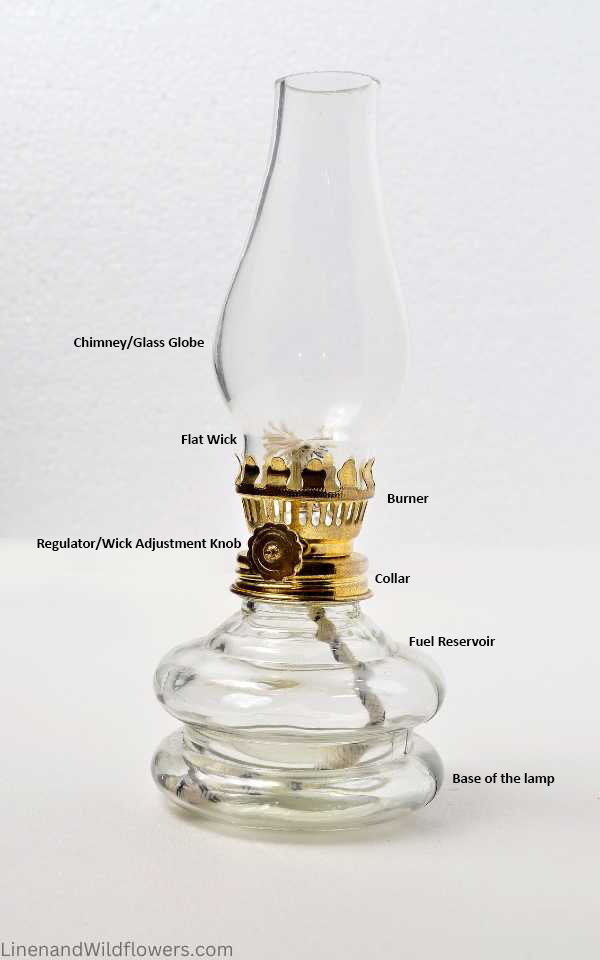
- Glass Chimney: This is the protective shield and engine for your flame. It does more than just shield the flame from drafts; its tubular shape creates an upward draft, pulling in fresh air for combustion and directing the heat and smoke safely upward. A clean, uncracked chimney is non-negotiable for a bright, safe burn.
- Burner Assembly: This is the command center of your lamp. It is the metal unit that screws onto the font and houses the wick tube and the critical fuel control mechanism. Everything that governs the flame—how high it rises, how much fuel it drinks—is managed here.
- Fuel Font: This is the lamp’s stomach, the reservoir that typically holds between 4 and 16 ounces of lamp oil. It is the base upon which the entire structure is built. Keeping it clean and free from water or debris is fundamental to the lamp’s operation.
- Wick Adjustment Knob: This is your direct line of control. By turning this knob, you raise or lower the wick from the burner assembly, which directly dictates the flame’s height and, consequently, the lamp’s brightness and fuel consumption.
Critical Maintenance Points
While every part is important, certain points demand your vigilant attention. These are the places where wear happens, where grime accumulates, and where a little preventative care pays the greatest dividends.
| Component | Maintenance Focus | Why It’s Critical |
|---|---|---|
| Wick Tip | Regular trimming to a flat, even edge. | A misshapen or charred wick will burn inefficiently, producing smoke and soot while giving poor light. A flat tip ensures a clean, bright, and circular flame. |
| Chimney Interior | Weekly cleaning to remove soot film. | A layer of soot can block up to 40% of the light output. It also creates dangerous hot spots on the glass, which can lead to thermal cracking. |
| Burner Threads | Occasional lubrication with high-temperature grease. | These are the threads that connect the burner assembly to the fuel font. Keeping them lightly lubricated prevents seizing and corrosion, ensuring you can always disassemble your lamp for deeper cleaning. |
| Fuel Valve & Seal | Inspection for wear and cleaning to ensure a tight seal. | This mechanism, housed within the burner assembly, is what prevents highly flammable lamp oil from leaking out. A compromised seal is a direct fire hazard. |
A well-maintained lamp is a reliable companion. To keep every one of these components in top condition, using tools designed for the purpose is key. The 2025 Premium Lamp Care Set includes a chimney brush, specialized wick trimmers, and lubricant to address all these critical points effectively. This essential kit is available at: [Insert Product Link Here].
Choosing the Right Fuel

Just as you would not feed a prized hunting dog poor scraps, you must not feed your lamp the wrong fuel. The lifeblood you choose determines the quality of the light, the cleanliness of the burn, and the very safety of your home. The right fuel makes the lamp a comforting hearth; the wrong one makes it a hazardous foe.
Fuel Type Comparison
Your choice primarily lies between two champions: traditional kerosene and refined lamp oil. Each has its own territory where it reigns supreme.
Kerosene vs. Lamp Oil
The decision between these two is a classic trade-off between raw power and clean convenience.
- Kerosene: This is the old, reliable workhorse. It is cost-effective, typically priced between $5-8 per gallon, and produces a notably brighter burn. However, this power comes with a distinct and often unpleasant odor that can permeate a room. It is a fuel born for the workshop, the barn, or any well-ventilated space.
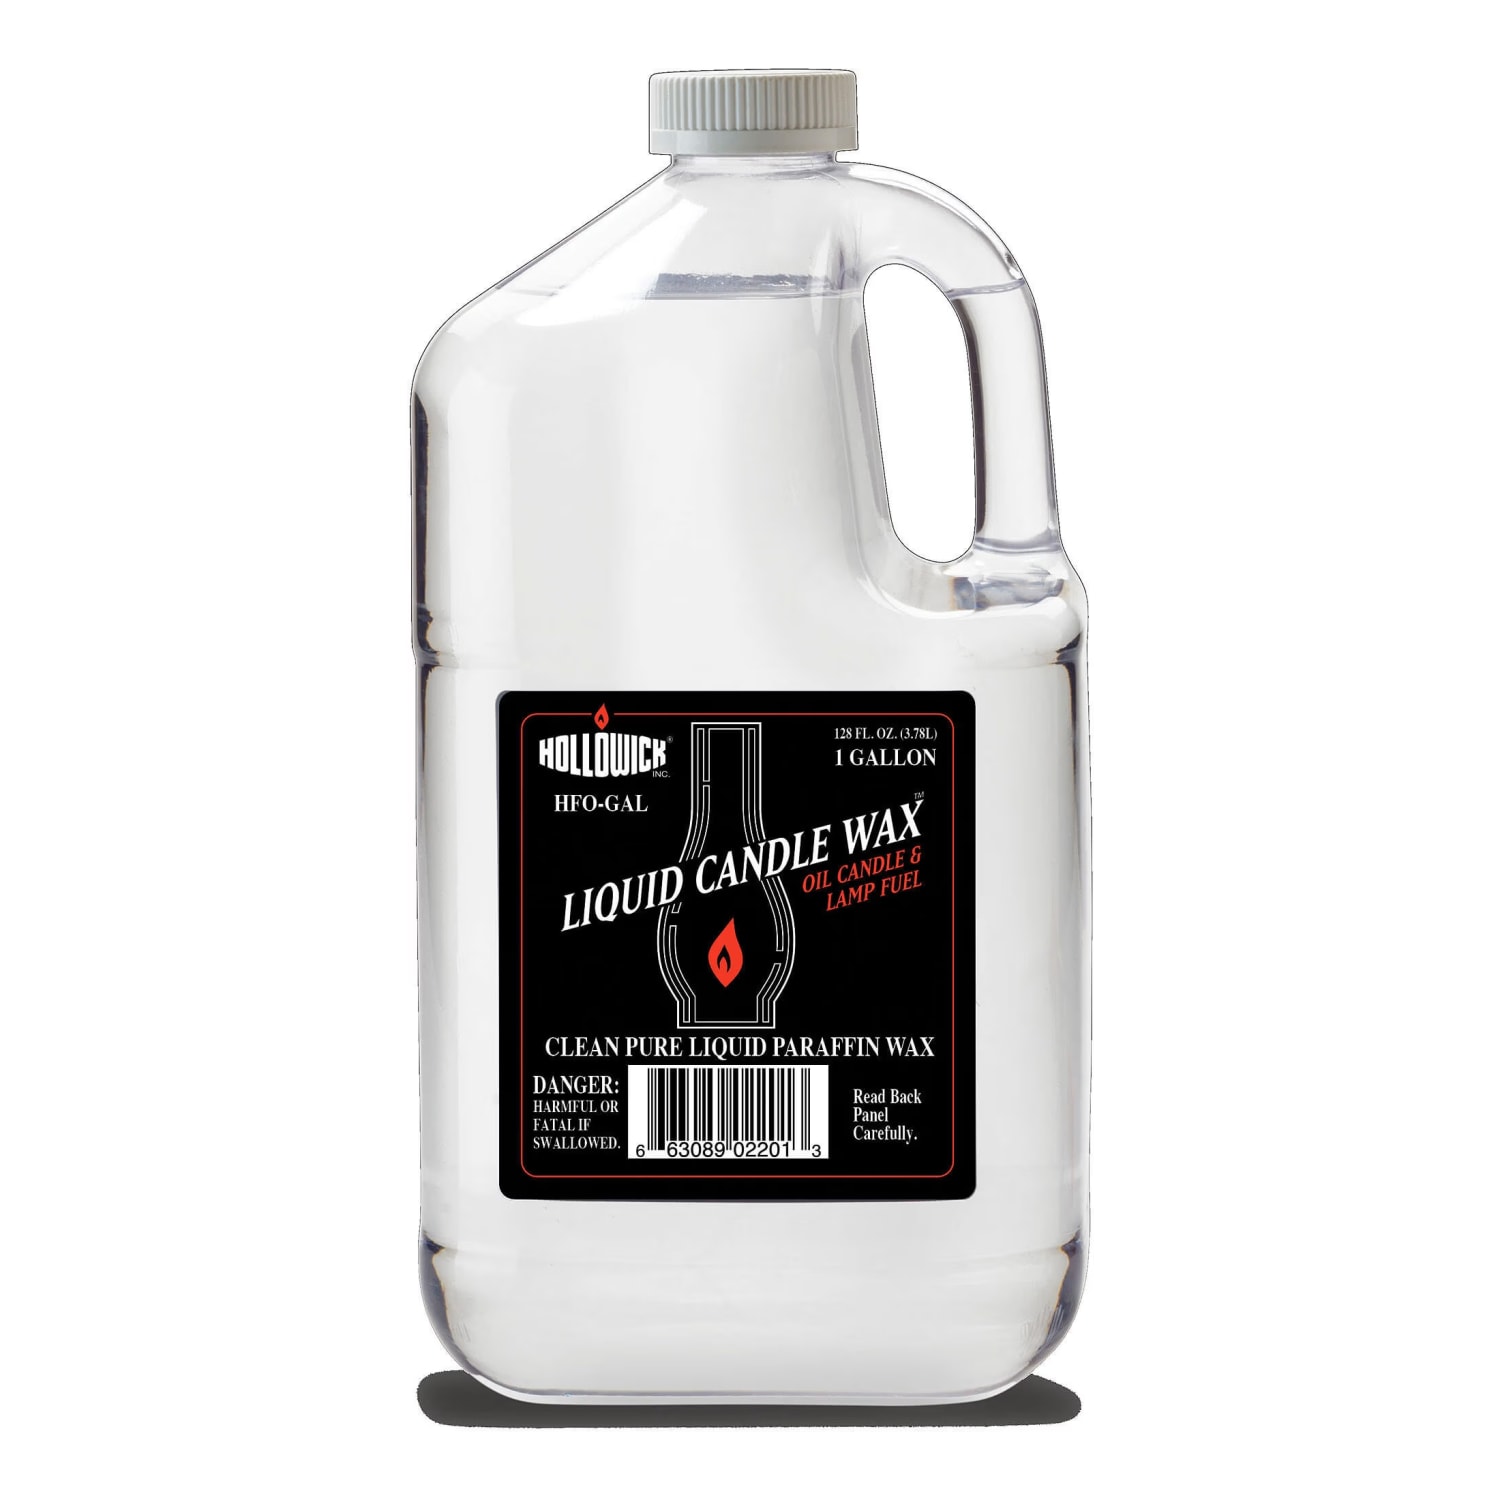
- Paraffin Lamp Oil: This is the civilized cousin, refined and purified for indoor life. It is more expensive, usually $10-15 per gallon, but it is virtually odorless and produces significantly less soot, making it the only safe choice for indoor use in living spaces. The flame is slightly less brilliant than kerosene’s, but the trade-off for clean air is well worth it for most.
Regardless of your choice, a standard oil lamp has an average consumption of approximately 0.5 ounces of fuel per hour. Plan your refills and storage accordingly.
Alternative Fuel Options
In a pinch, or for a specific ambiance, you might consider other fuels. Tread carefully here, for this is where many a good lamp is ruined.
- Olive Oil: A natural, ancient option. It burns smokeless but produces a much dimmer flame. It works best with special wide-wick lamps and is not ideal for standard wick-based lamps for long periods.
- Vegetable Oils (Canola, etc.): These should be considered emergency-use only. While they will burn, they are thick and viscous. With repeated use, they can clog wicks and the delicate fuel delivery system of your burner, leading to poor performance and requiring a deep clean.
- Emergency Alternatives: In a true survival scenario, a clear, high-proof alcohol might be used for a very short time. However, you must never use gasoline or automotive fuels. They are wildly volatile, have a low flashpoint, and will turn your lamp into an uncontrolled explosive device.
Fuel Safety Considerations
Handling fuel is handling potential energy; it demands respect and a strict adherence to protocol. Safety is not a suggestion—it is the law of the hearth.
Indoor vs. Outdoor Use
Knowing where to use each fuel is the first rule of safety.
- For any enclosed space like a living room or bedroom, you should use only refined lamp oil. Its high flashpoint and lack of fumes make it the sole safe choice.
- Kerosene requires cross-ventilation, meaning at least two windows open to create a draft. It is suited for a garage, a porch, or a workshop where the odor and any potential fumes can dissipate safely.
- As stated, the rule is absolute: Never use gasoline or alcohol-based fuels in a traditional wick lamp. The flame can travel down the wick and into the font, causing an explosion.
Storage and Handling
How you store your fuel is as important as which fuel you choose. Proper practice here prevents tragedies before they can even be conceived.
- Always use approved, dedicated containers. For kerosene, it is a universal standard and often a legal requirement to use blue containers to prevent confusion with gasoline or water.
- Store all fuels in a cool, dark place away from any heat sources or open flames, including your furnace or water heater.
- When filling your lamp’s font, keep the fuel level at least ½ inch below the fill line. This “ullage” space is crucial. It allows for fuel expansion as the lamp warms up and prevents dangerous overflow, which could feed a fire. A clean fuel system is a safe one. To ensure your fuel remains pure and your lamp’s internals are protected, consider using the 2025 Premium Lamp Care Set, which includes a fuel funnel with a fine mesh filter to screen out debris. You can find this vital maintenance tool at: [Insert Product Link Here].
Daily Cleaning Routine
A well-maintained oil lamp is a steadfast companion, its warm glow a testament to your careful stewardship. Just as a woodsman sharpens his axe after a day’s work, tending to your lamp after each use ensures it will be ready and reliable when next called upon. This simple, consistent routine is the heart of lamp longevity.
After-Each-Use Maintenance
Allow the lamp to cool completely until it is safe to handle. This post-light care is the most critical practice for a clean burn and a long-lasting lamp.
Wick Care and Trimming
The wick is the heart of the flame, and its condition dictates everything. A poorly maintained wick produces smoke, soot, and an uneven, flickering light.
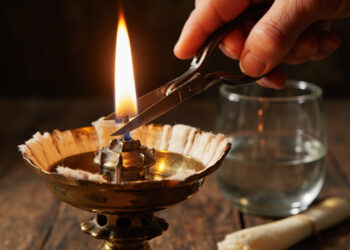
- Extinguish and Cool: Never attempt to trim a wick that is still hot. Let the lamp sit for at least 15-20 minutes after putting the flame out.
- Remove Charred Material: Lift the chimney and carefully raise the wick. Using your fingers or a small, dry cloth, gently pinch the very top of the wick and pull away. This will remove the brittle, charred “mushroom” or “cap” that forms during burning.
- Trim the Wick: With a pair of sharp scissors, trim the wick straight across. The goal is a flat, even edge. After trimming, round the two corners slightly. This simple step prevents the pointed corners from overheating and causing the glass chimney to crack from thermal stress.
- Lower the Wick: Before replacing the chimney, always lower the wick back down into its housing so it is ready for the next lighting.
Chimney Cleaning Process
A clean chimney is to a lamp what a clear window is to a home; it allows the full strength of the light to shine through. Soot buildup dims the light and becomes increasingly difficult to remove over time.
- The Warm Wipe (Best Practice): The most effective time to clean the chimney is when it is still slightly warm from use—warm to the touch, but not hot. Crumple up a sheet of newspaper and use it to wipe the inside of the chimney. The slight residual heat and the abrasive texture of the newsprint will lift soot effortlessly without harsh chemicals.
- For Stubborn Soot: If the chimney has cooled or has heavier buildup, wash it in lukewarm water with a small drop of dish soap. Use a soft cloth to clean it, never an abrasive scrubber which can scratch the glass.
- The Final Step: Whether you used the newspaper method or washed it, you must ensure the chimney is completely dry, inside and out, before placing it back on the lamp and relighting. Any moisture will cause the glass to crack when heated.
Quick Safety Check
Before you strike the next match, take a moment. This 30-second inspection is your ritual, your final confirmation that all is as it should be. It is the difference between a comforting glow and a dangerous situation.
Pre-Lighting Inspection
Make this brief check as habitual as breathing.
- Check for Fuel Leaks: Look at the base of the burner assembly where it screws into the font. Run a finger around the joint feeling for any dampness or the distinct smell of fuel. If you detect a leak, do not light the lamp.
- Ensure Chimney is Securely Seated: Place the clean, dry chimney onto the lamp, ensuring it sits firmly on the burner gallery or the provided tabs. A wobbly chimney is a hazard and will not allow the lamp to draft properly, leading to smoke and poor performance.
- Verify Wick Height: Before lighting, the wick should be trimmed as described above and lowered. When you are ready to light, turn the wick knob until only about 1/8 to 1/4 inch of wick is exposed above the burner. You can adjust it higher once the flame is established for more light. A properly adjusted wick is the key to a smoke-free flame.
For those who take their lamp maintenance seriously, having the right tools on hand makes all the difference. The 2025 Premium Lamp Care Set includes specialized wick trimmers designed for a perfect cut, a soft cleaning cloth that won’t scratch glass, and a filtered funnel for clean refueling. You can find this essential kit to keep your lamp in prime condition at: [Insert Product Link Here].
Deep Cleaning Procedures

While the daily ritual keeps your lamp shining brightly, a monthly deep clean is what preserves it for the long haul. It is the thorough, deliberate work that a trusted tool deserves, ensuring it remains a reliable beacon through many seasons.
Monthly Maintenance Schedule
Set aside a time each month, perhaps on a quiet afternoon, to perform this more detailed service. Your lamp will repay you with a cleaner, brighter, and safer light.
Burner Assembly Cleaning
The burner assembly is the engine of your lamp, and over time, it can become clogged with old, gummy oil and carbon deposits. A clean burner is essential for a steady, smokeless flame.
- Prepare the Cleaning Solution: Carefully unscrew the burner assembly from the font (the fuel reservoir). In a small pot, bring equal parts water and baking soda to a boil. The baking soda acts as a gentle but effective degreaser.
- Soak the Components: Place the disassembled burner parts (excluding any plastic or leather components) into the boiling solution. Remove the pot from the heat and allow it to soak. For light grime, 30 minutes may suffice. For heavier buildup, leaving it to soak overnight is perfectly acceptable.
- Scrub and Dry: After soaking, use a soft-bristled brush, like an old toothbrush, to gently scrub away any remaining residue from all the parts, paying close attention to the small air tubes and the wick housing. Rinse all components thoroughly with clean water. This is the most critical step: you must ensure every part is completely dry, inside and out, before reassembly. Let the parts air dry for several hours or use a hair dryer on a cool setting to expedite the process.
Fuel Font Maintenance
The font holds the lifeblood of your lamp. Keeping it clean prevents contaminants from reaching the wick and ensures a perfect seal at the burner threads.
- Empty and Wipe: In a well-ventilated area, carefully pour any unused fuel back into its original container. Using a clean, lint-free cloth, wipe the entire interior of the font to remove any sediment or residual oil.
- Inspect for Damage: Hold the font up to a light and look inside for any signs of corrosion, rust, or hairline cracks. Any compromise to the font’s integrity means the lamp should be retired from use.
- Check the Threads: Examine the threads where the burner assembly screws on. They should be clean and undamaged. Wipe them with your cloth to ensure a smooth, tight seal upon reassembly.
Troubleshooting Common Issues
Even a well-maintained lamp can sometimes behave unpredictably. Knowing how to respond is part of the art of lamp keeping.
Smoke and Soot Problems
A smoking lamp is a cry for help; it is inefficient and will quickly coat your chimney in black soot. The response is immediate and methodical.
- First Action: If you see smoke, immediately turn the wick knob down to lower the wick height. A wick that is too high is the most common cause of smoking.
- Check the Draft: Ensure the chimney is seated correctly and securely. A misaligned chimney disrupts the air draft necessary for clean combustion. Also, verify that the air vents on the burner assembly are not blocked.
- Verify Fuel Type: Always use the fuel recommended for your lamp, typically clear, purified lamp oil. Never use gasoline, diesel, or other improper fuels, as they produce excessive soot and are extremely dangerous.
Flame Flickering Solutions
A flickering flame can be charming, but a steady, unwavering flame is the mark of a lamp in perfect health. It indicates a consistent fuel supply and a protected burn.
- The Wick is Key: A wick with an uneven edge will produce a flickering, dancing flame. Always ensure your wick is trimmed perfectly straight and the corners are slightly rounded.
- Eliminate Drafts: A flicker can often be caused by a cross-breeze in the room. Check for an open window or a nearby air vent that might be disturbing the flame.
- Fuel Saturation: If the wick is new or the font was recently refilled, the wick may not be fully saturated with fuel. Wait a few minutes for the oil to travel up the wick completely before relighting. A flickering, sputtering flame can also indicate a clogged wick from old, gummy fuel, necessitating a wick replacement.
For those dedicated to the craft, having specialized tools elevates this maintenance from a chore to a satisfying ritual. The 2025 Premium Lamp Care Set includes a brass-bristled brush perfect for scrubbing the burner assembly, a set of lint-free polishing cloths, and a spout cap for clean and safe fuel storage. You can procure this comprehensive set to master your lamp’s care at: [Insert Product Link Here].
Long-Term Storage Guide
When the seasons turn and your lamp will not see regular use for a while, a proper send-off into storage is an act of preservation. It is the final, careful step that ensures your faithful companion will awaken bright and ready when you next need its warm glow.
Seasonal Storage Preparation
Preparing a lamp for storage is not merely about putting it away; it is about actively protecting it from the slow decay that idleness can bring. A little effort now prevents frustration and damage later.
Proper Fuel Management
Old fuel left to stagnate in the font is the primary enemy of a stored lamp. It becomes gummy, can corrode the metal font, and will clog a wick beyond repair.
- Empty the Font Completely: If you plan to store the lamp for more than two months, you must empty the fuel reservoir. Do this in a well-ventilated area. Use a funnel to pour every last drop of unused fuel back into its original container or a dedicated fuel can.
- Store Fuel in Approved Containers: Never store lamp oil in makeshift containers. Use only the original bottle or containers explicitly approved for kerosene or lamp oil to prevent chemical degradation and leakage.
- Label Containers: Take a moment to clearly label your fuel containers with the contents and the date of storage. This simple habit ensures you always know what you have and how long it has been kept.
Wick Storage Techniques
The wick is the lamp’s soul, and leaving it sitting in an empty or partially filled font can cause it to become brittle or attract moisture.
- Remove the Wick: After the burner assembly has cooled completely from its final use, carefully unscrew it and slide the wick out of its housing.
- Store Separately: Place the used wick in a small, sealable plastic bag. If it is a new, spare wick, keep it in its original packaging.
- Protect from Elements: Store the bagged wick in a dry location, away from dust and any potential moisture. This prevents it from becoming a home for pests or losing its ability to draw fuel effectively.
Storage Environment
Where you choose to store your lamp is as important as how you prepare it. The right environment is a silent guardian against the elements.
Ideal Conditions
Think of your lamp as you would a fine book or a valued photograph; it requires a stable, gentle environment.
- Temperature-Stable Area: Choose a storage spot like a closet or cupboard inside your home, where temperatures remain relatively constant. Avoid attics that bake in the summer or garages and sheds that freeze in the winter, as extreme temperature swings can damage metal, glass, and seals.
- Low Humidity Environment: Humidity is the source of rust and corrosion. A dry interior space is essential. If you live in a particularly humid climate, including a small desiccant packet (like those found in new electronics or shoe boxes) in the storage area can help absorb ambient moisture.
- Away from Direct Sunlight: Prolonged exposure to direct sunlight can fade painted finishes and, over many years, potentially make the glass chimney brittle. A dark shelf or a cabinet is the perfect resting place.
A well-prepared lamp is a promise of light for the future. To ensure your wick is always in prime condition for relighting, consider the Heritage Wick Replacement Pack. This 2025 set includes a variety of high-quality, pre-trimmed cotton wicks and a handy storage pouch, making seasonal preparation straightforward. Find the right wick for your lamp at: [Insert Product Link Here].
Safety Protocols and Emergency Preparedness

The warm, dancing flame of an oil lamp is a source of comfort and light, but like any open flame, it demands respect. A well-maintained lamp is a safe lamp, and understanding the fundamentals of its operation is your first line of defense. Safety is not about fear; it is about the confident and knowledgeable control of a powerful tool.
Oil Lamp Safety Fundamentals
Treat your lamp with the same caution you would a kitchen stove or a fireplace. A moment of attention can prevent a lifetime of regret. The rules are simple, clear, and absolute.
Fire Prevention Measures
Fire is a hungry element, always seeking to spread. Your vigilance is the barrier that contains it.
- Keep lamps on stable, non-flammable surfaces: Always place your lamp on a solid, level surface that cannot easily be knocked over. The best surfaces are stone, tile, metal, or glass. Never place a lit lamp on a wobbly table, a plastic surface, or any other flammable material.
- Maintain 3-foot clearance from combustible materials: Imagine a circle of safety around your lamp. Keep this area clear of curtains, loose papers, books, upholstered furniture, bedding, and any other material that could catch a stray spark or be heated by the lamp’s radiant warmth.
- Never leave burning lamps unattended: This is the cardinal rule. If you are leaving the room or going to sleep, extinguish the lamp. A lamp should never be left burning in an empty house or a room where everyone is asleep.
Carbon Monoxide Safety
The flame consumes oxygen and produces carbon monoxide (CO), an invisible, odorless gas that can be deadly. This danger is easily managed with awareness and preparation.
- Ensure adequate ventilation during use: Never use an oil lamp in a sealed, airtight room. Always crack open a window or ensure there is a source of fresh air circulation. This is especially crucial in modern, energy-efficient homes.
- Recognize symptoms of CO exposure: Early symptoms of carbon monoxide poisoning are often flu-like and include headache, dizziness, weakness, upset stomach, vomiting, chest pain, and confusion. If multiple people in the home experience these symptoms simultaneously, or they improve when leaving the house, suspect CO exposure immediately, get to fresh air, and seek medical help.
- Install CO detectors in lamp-use areas: Your most reliable safeguard is a working carbon monoxide detector. Install one on every level of your home, particularly outside sleeping areas and in any room where you frequently use your oil lamp. Test the batteries monthly.
Emergency Lighting Solutions
When the grid fails, your oil lamp transforms from a decorative accent into a vital piece of equipment. Being prepared means you can face the darkness not with anxiety, but with a steady, reassuring light.
Power Outage Preparedness
A blackout is not the time to discover your lamp is empty and your wick is spent. Your preparedness kit should be as ready as you are.
- Keep multiple lamps fueled and ready: Designate at least two lamps as your emergency set. Keep their fonts filled with clean lamp oil and their wicks properly trimmed and ready to light. One lamp can be a primary light source, while the other serves as a backup or can be moved to another room.
- Store extra wicks and chimneys: These are the most vulnerable parts of your lamp. Keep a supply of new wicks and at least one spare chimney stored safely with your emergency lamps. A broken chimney or a degraded wick during a storm renders a lamp useless.
- Maintain week’s supply of lamp oil: A good rule of thumb is to store at least one gallon of lamp oil per lamp you intend to use regularly. This ensures you can weather an extended power outage without your light fading.
Camping and Outdoor Use
Taking your lamp into the great outdoors requires additional considerations. The environment is less controlled, but your safety practices must be even more controlled.
- Secure lamps against tipping: Never place a lamp on the ground where it can be kicked or on an uneven surface. Use a stable camp table or a dedicated, level stand. In a tent, it is safest to use a battery-powered lantern instead, as the risk of fire is too high.
- Use in well-ventilated outdoor areas: While outdoors generally provides ample ventilation, be mindful of using a lamp inside a sheltered camp kitchen or a gazebo with enclosed sides. Always ensure smoke and fumes have a clear path to dissipate.
- Bring backup lighting options: Your oil lamp is your primary light, but always carry backup options such as a flashlight or a headlamp. These are essential for tasks like refueling the lamp in the dark, navigating away from the campsite, or in case the lamp is extinguished by a sudden gust of wind.
For peace of mind during an unexpected blackout, the 2025 Ready-Light Emergency Kit provides everything you need in one package. It includes a pre-trimmed, high-quality wick, a durable clear chimney, and a one-quart bottle of clean-burning lamp oil, ensuring your light is just a match strike away. Prepare your home today at: [Insert Product Link Here].
Advanced Maintenance Techniques
With the fundamentals of safety and emergency readiness firmly in place, you can now turn your attention to the finer points of care. A well-maintained oil lamp is not only safer but also a more reliable and brilliant source of light. Mastering these techniques will deepen your connection to this timeless tool, ensuring it serves you faithfully for years to come.
Vintage Oil Lamp Care
Owning a vintage oil lamp is like holding a piece of history in your hands. These lamps have stories to tell, and with careful, respectful maintenance, you can ensure they continue to shine for generations. The goal is not to make them look brand new, but to honor their age while restoring their function.
Restoring Older Lamps
Restoration is a patient art. It requires a gentle touch and an appreciation for the lamp’s journey. Rushing or using harsh methods can permanently damage fragile components.
- Gentle cleaning methods for antique glass: Avoid modern abrasive cleaners. For cloudy glass or minor deposits, create a paste from baking soda and warm water. Apply it with a soft cloth, gently rubbing in a circular motion. For stubborn grime inside the font, add a tablespoon of vinegar to the baking soda paste; the mild fizzing action can help loosen residue without scrubbing. Always rinse and dry thoroughly.
- Replacement part sourcing guidelines: Finding parts for a vintage lamp requires diligence. Start by identifying the manufacturer and model, if possible. Specialist online retailers, antique shops, and even eBay can be good sources. When ordering, provide clear photographs and precise measurements of the broken part, especially the thread sizes. Patina matching on brass parts is often preferable to a bright, new finish for maintaining historical value.
- Preserving historical integrity: The goal is conservation, not necessarily complete restoration. Avoid repainting decorated fonts or polishing brass to a mirror shine if it means removing all its character. A gentle cleaning with a mild brass polish or simply a wipe with a soft cloth to remove dust is often all that is needed. Preserve original labels and markings whenever possible.
Customization and Upgrades
Sometimes, a thoughtful upgrade can enhance a vintage lamp’s usability without detracting from its soul. The key is to choose modifications that are reversible and in keeping with the lamp’s era.
- Wick material alternatives: While flat-braided cotton wicks are standard, consider upgrading to a newer high-tech fiber wick if your burner assembly can accommodate it. These modern wicks can offer a cleaner burn with less carbon buildup (charring), resulting in a steadier flame and reduced smoke.
- Chimney glass options: If the original chimney is missing or cracked, you have an opportunity to choose one that optimizes performance. Clear, smooth chimneys provide the brightest light. Prismatic or “hurricane” chimneys can scatter the light beautifully, while mica chimneys are more shatter-resistant for outdoor use. Ensure the new chimney is the correct height and diameter for your lamp.
- Burner efficiency improvements: For lamps with older, simple burners, a significant upgrade is to source a period-correct “hot-blast” or “cold-blast” burner. These designs use the chimney’s draft to preheat air or better mix air with fuel, creating a more efficient and brighter flame. This is a more advanced modification but can dramatically improve the lamp’s performance.
Performance Optimization
A lamp that is merely functional is one thing; a lamp that is finely tuned is another. By understanding the relationship between its components, you can squeeze every last lumen of light from your fuel while ensuring a long service life for your equipment.
Maximizing Light Output
A bright, white, and steady flame is the hallmark of a perfectly adjusted lamp. It is the result of a harmonious balance between three key elements.
- Proper wick height adjustment techniques: The wick should be trimmed straight across and free of any charred “mushrooms” before each lighting. After lighting, adjust the height slowly. A flame that is too low will be dim and yellow; a flame that is too high will produce smoke and soot the chimney. The ideal height is typically when the tip of the flame is just below the point where it begins to smoke. A clear, bright, teardrop-shaped flame is your goal.
- Fuel quality impact on brightness: The purity of your fuel directly affects the quality of your light. Low-quality or old kerosene can contain impurities that clog the wick and create a smoky, uneven flame. For the brightest and cleanest burn, use only high-purity, clear lamp oil. Avoid colored or scented oils if your primary concern is maximum illumination.
- Chimney cleanliness effect on lumens: A soot-smudged chimney can block a significant percentage of your lamp’s light output. Make it a habit to wipe the inside of the chimney with a soft, dry cloth once it has completely cooled after every few hours of use. For a deeper clean, wash it in warm, soapy water and dry it thoroughly before relighting. A sparkling chimney is a simple yet highly effective way to boost brightness.
Efficiency Improvements
Efficiency means more light for less fuel and longer intervals between maintenance. It is the practice of a wise and economical lamp keeper.
- Fuel consumption reduction methods: The single biggest factor in fuel consumption is wick height. A properly trimmed and adjusted wick, as described above, is the most effective way to conserve oil. Additionally, using a chimney designed for good draft (like a hot-blast style) helps the fuel burn more completely, extracting more energy from each drop.
- Wick life extension techniques: Always extinguish the lamp by turning the wick down into the font until the flame is smothered, then raise it slightly for the next lighting. This prevents the wick from becoming stuck in a charred state. When trimming, never cut the wick too short; you should always have enough wick to reach the oil in the font. Rotating the wick adjuster knob periodically can help present a fresh, flat edge to the flame.
- Heat management strategies: A lamp that runs too hot can vaporize fuel too quickly and is uncomfortable to be near. Ensure the air vents in the burner assembly are not blocked. If you find the lamp is producing excessive heat, try lowering the wick slightly. This will reduce the size of the flame and its heat output, while often improving the quality of the light.
For those seeking to elevate their lamp’s performance with modern components, the 2025 Lumen-Max Upgrade Bundle offers a curated selection of high-efficiency wicks and optically clear chimneys designed to work in harmony for a noticeably brighter, cleaner burn. Explore the collection and transform your lamp’s output at: [Insert Product Link Here].
The Final Word on Oil Lamp Upkeep
Mastering oil lamp maintenance transforms it from a simple object into a dependable source of light and comfort. The core principles are consistent: regular wick trimming for a clean burn, diligent chimney cleaning for maximum brightness, and correct fuel management for safety and efficiency. A well-maintained lamp not only provides superior illumination but also significantly reduces risks like carbon monoxide and fire hazards. By integrating the daily, monthly, and seasonal routines outlined in this guide, you honor the timeless design of your lamp and ensure its readiness whenever you need it.
We hope this comprehensive guide empowers you to care for your oil lamp with confidence. What is your most valuable maintenance tip? Share your experience in the comments below and help fellow enthusiasts keep their flames burning bright. For those ready to begin, having the right tools makes all the difference. Click here to explore our recommended maintenance kits and start your journey to perfect lamp care today.


