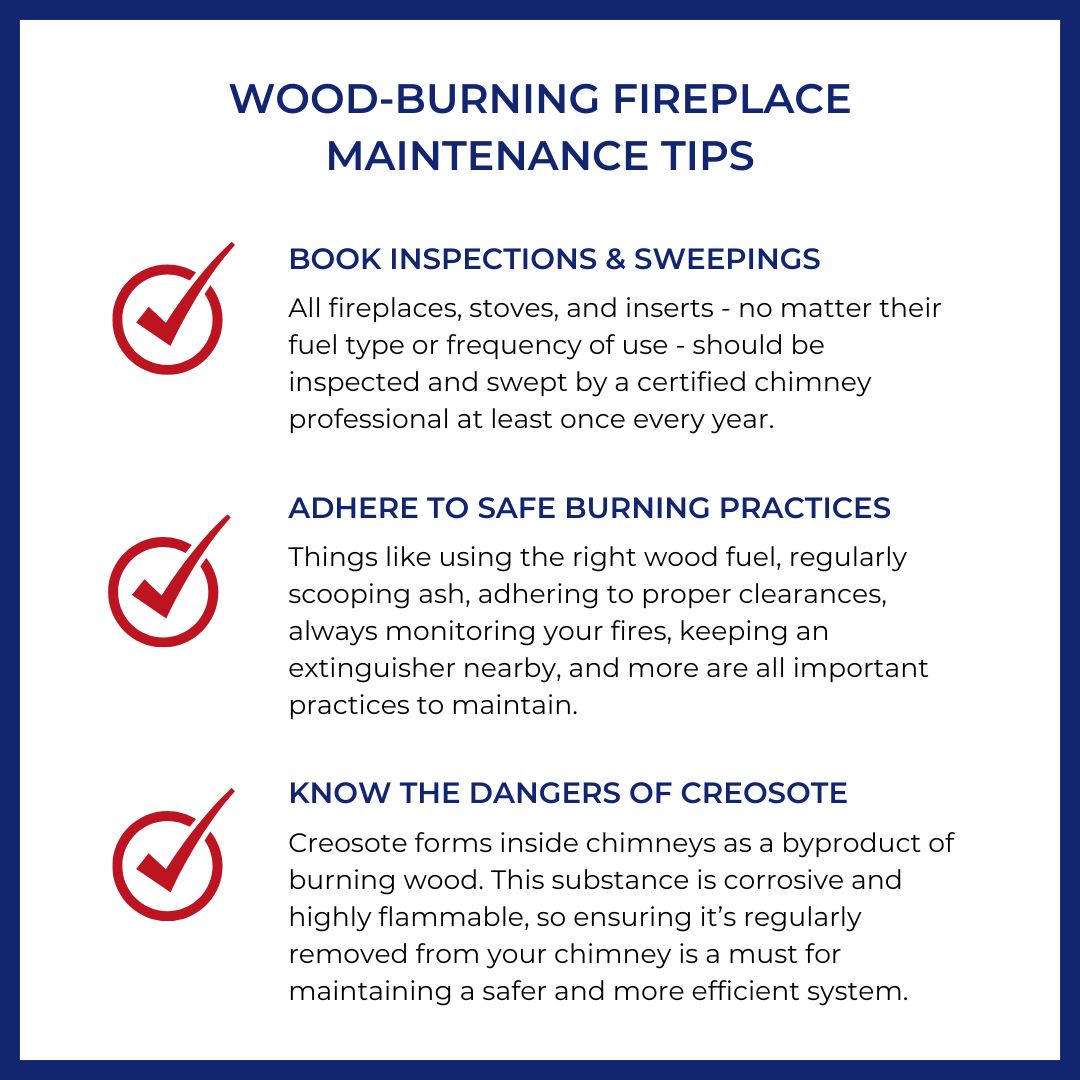
Did you know that neglecting your wood stove cleaning routine can increase your annual heating costs by 20% and significantly raise fire risks? Proper wood stove maintenance is not just about cleanliness—it’s a critical practice that directly impacts your home’s safety, heating efficiency, and environmental footprint. This comprehensive guide reveals why regular cleaning matters and how implementing a systematic approach can transform your wood-burning experience while protecting your household from preventable dangers.

Why Proper Wood Stove Cleaning Matters

Efficiency and Performance Benefits
A well-maintained wood stove is not merely a matter of aesthetics; it is the cornerstone of performance and economy. When you commit to a regular cleaning regimen, you are directly investing in the stove’s ability to convert fuel into usable heat, ensuring your home remains warm and your woodpile lasts significantly longer.
Understanding Combustion Efficiency
The science behind your stove’s operation is straightforward: a clean stove is an efficient stove. The accumulation of soot and creosote on the interior surfaces, particularly the firebox and flue, acts as a powerful insulator. This layer of grime impedes the transfer of heat from the fire to the room, forcing you to burn more wood to achieve the same level of comfort. Consider these practical metrics:
| Maintenance Condition | Typical Efficiency | Annual Heating Cost Impact |
|---|---|---|
| Clean, Well-Maintained Stove | 75-85% efficiency | Baseline (Potential 15-20% savings) |
| Neglected, Dirty Stove | 45-55% efficiency | 15-20% increase in fuel costs |
As the table illustrates, soot accumulation can reduce heat transfer by up to 30%. By maintaining a clean unit, you are not just tidying up; you are actively saving on heating costs annually, making your wood-burning efforts both effective and economical.
Safety Considerations
Beyond performance, the most compelling reason for diligent cleaning is safety. The byproducts of wood combustion, if left unchecked, create significant hazards that can compromise your home and well-being. A proactive approach to maintenance is your first and best defense.
Preventing Chimney Fires
The primary safety concern is the prevention of chimney fires, which are almost entirely avoidable with proper care. Creosote, a tar-like substance that condenses on cooler flue surfaces, is highly flammable. Its buildup is the leading cause of over 25,000 chimney fires annually. The relationship between cleaning and safety is direct and powerful: regular cleaning, as part of a comprehensive maintenance schedule, reduces the risk of a chimney fire by approximately 90%. It is also crucial to understand the critical temperature thresholds for safe operation; a clean flue allows for proper drafting and helps keep the internal temperatures within a safe, efficient range, preventing the conditions that lead to a dangerous ignition of creosote deposits.
Environmental Impact
In 2025, the responsibility of operating a wood-burning appliance extends beyond our own homes to the broader environment. A clean stove is a cleaner-burning stove, and proper maintenance is a simple yet effective way to minimize your ecological footprint while protecting indoor air quality.
Reducing Emissions
The environmental advantages of a clean wood stove are measurable and significant. When combustion is inefficient due to a dirty stove or clogged flue, the stove produces excessive smoke containing harmful particulate matter. A well-maintained stove, by contrast, can produce up to 70% less particulate matter, contributing to cleaner air. Furthermore, proper maintenance drastically decreases carbon monoxide risk by ensuring complete combustion and adequate ventilation. This commitment to clean operation aligns with the stringent EPA certification standards for wood stove efficiency, which are designed to ensure that modern wood stoves are a responsible heating choice. By keeping your stove and its accessories clean, you are upholding these standards and doing your part for the environment.
To assist you in maintaining this high standard of care, I have found a particularly effective and versatile cleaning cream that works wonders on stove glass and metal surfaces. It’s a staple in my own maintenance toolkit.
- Product: Parker & Bailey Stainless Steel Cleaner & Polish
- Link: https://amzn.to/3KpD8o1
Essential Cleaning Tools and Supplies

A successful cleaning session begins with the right tools at your disposal. Just as you would not bake a cake without measuring cups, you should not approach your wood stove without the proper, purpose-built equipment. Having these items on hand transforms a daunting chore into a manageable, efficient, and safe routine.
Must-Have Cleaning Equipment
The foundation of effective stove maintenance is a collection of dedicated tools designed to handle the unique challenges of ash and soot. Using the wrong equipment can be inefficient at best and hazardous at worst.
Specialized Vacuum Systems
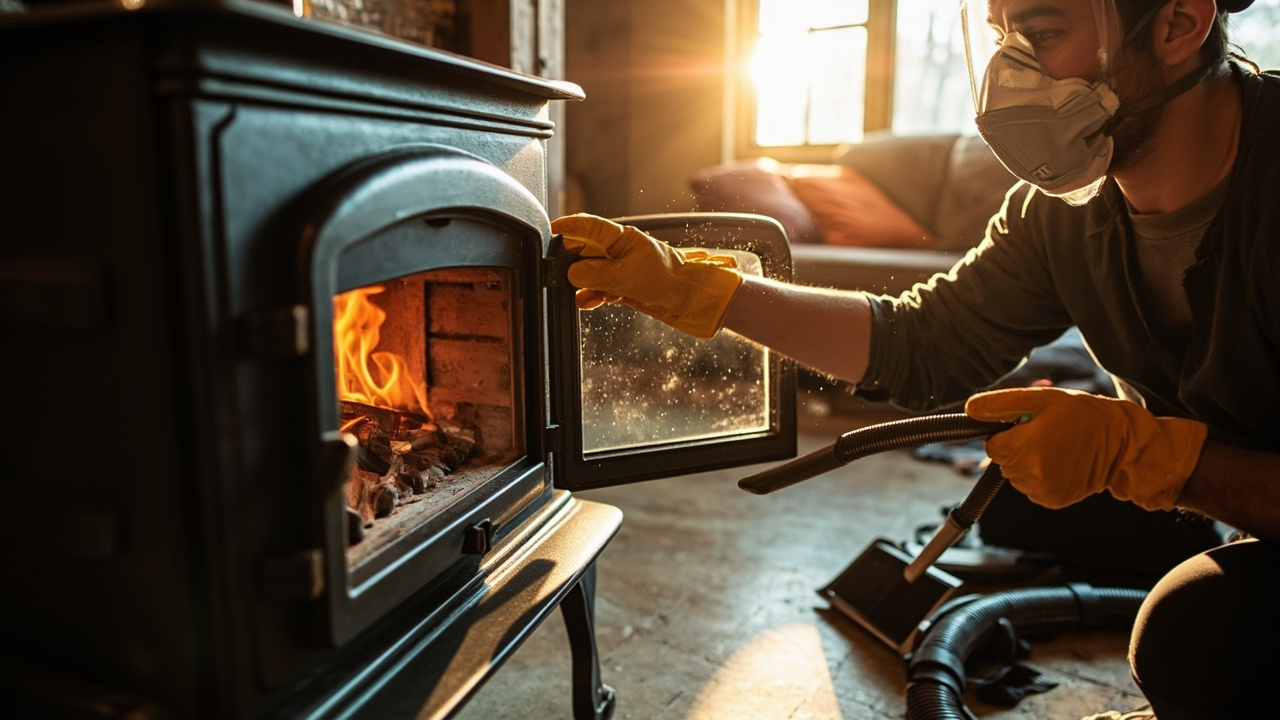
A standard household vacuum is utterly unsuitable for wood stove ash; the fine particles can clog the motor and pose a serious fire risk. An ash vacuum is non-negotiable. Look for a model with a 15-20 liter capacity, which is sufficient for most cleaning sessions without requiring constant emptying. Crucially, it must be equipped with a fire-resistant filter and a metal canister. For optimal safety and air quality, a HEPA filtration system is highly recommended, as it captures the finest ash particulates. When considering power sources, cordless vacuums offer superior maneuverability, but ensure the battery life is adequate for your stove’s size. Corded models provide consistent, uninterrupted power, which can be advantageous for larger or particularly messy clean-outs.
Cleaning Solutions and Chemicals
Not all cleaners are created equal, especially when dealing with the high temperatures and specific residues of a wood stove. Selecting the correct solutions will protect your stove’s finish and ensure a pristine result.
Safe Chemical Options
For touching up minor scratches on your stove’s exterior, use only high-temperature, heat-resistant paint, which is formulated to cure properly at operating temperatures ranging from 400-600°F. When cleaning the viewing glass, avoid harsh ammonia-based cleaners, which can damage seals. Instead, opt for a cleaner with a neutral pH or a specifically formulated non-ammonia stove glass cleaner. For those who prefer a more natural approach, simple alternatives can be remarkably effective. A paste made from moistened wood ash is a mild abrasive perfect for scrubbing glass, while a diluted white vinegar solution works well for wiping down painted or enameled exterior surfaces.
Protective Gear and Safety Equipment
Your personal safety is paramount. Ash and soot are irritants, and the stove’s components can remain hot long after the fire has died. Proper gear is your first line of defense.
Personal Protection Standards
Begin with respiratory protection. A properly fitted N95 mask is essential for filtering out the fine ash particles that become airborne during cleaning. For handling ashes, embers, or hot components, invest in a pair of high-quality, heat-resistant gloves with a temperature rating that exceeds the residual heat of your cooled-down stove. Finally, always wear safety glasses or goggles with side shields to protect your eyes from falling debris or airborne dust when brushing the flue or emptying the ash pan.
To make the task of glass cleaning effortless, I consistently use a specific cleaner that lifts away soot without harsh chemicals. It keeps my stove’s window crystal clear.
- Product: Parker & Bailey Stainless Steel Cleaner & Polish
- Link: https://amzn.to/3KpD8o1
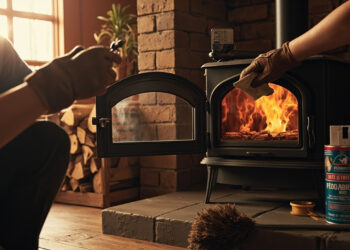
Step-by-Step Wood Stove Cleaning Process
A methodical approach to cleaning your wood stove is the key to both its longevity and your safety. This is not a task to be rushed, but a seasonal ritual that, when performed correctly, ensures many more years of efficient and beautiful service from your appliance.
Preparation and Safety Measures
Before a single tool is lifted, the stage must be set for a safe and contained cleaning session. Proper preparation prevents damage to your home and protects you from injury.
Cooling and Setup Procedures
The most critical safety rule is to allow for a complete cooldown. A minimum 24-hour cooling period is mandatory; never attempt to clean a warm stove. Once cool, begin by laying a damp drop cloth on the floor in front of the stove. This will catch any stray ash or soot, protecting your flooring and making final cleanup simple. Organize all your tools—ash vacuum, scraper, brushes, cleaning solutions, and protective gear—on a small, secondary cloth within easy reach. This creates an efficient workflow and prevents you from searching for items with sooty hands.
Firebox and Ash Removal
The heart of the stove requires careful attention. The goal is not to remove every speck of ash, but to manage it in a way that prepares the stove for its next use while preserving its components.
Comprehensive Ash Management
Using your dedicated ash vacuum, employ slow, methodical movements to collect the bulk of the ash. Avoid jamming the nozzle into the firebricks; gentle, sweeping motions are most effective. For those without a specialized vacuum, the manual method is a safe alternative: use a small metal ash shovel to transfer ashes into a dedicated, sealable metal bucket. It is important to leave a one-inch layer of ash at the bottom of the firebox. This ash bed aids in starting new fires by reflecting heat back into the fuel. While the firebox is empty, take this opportunity to inspect each firebrick. Look for cracks wider than a quarter-inch or any signs of crumbling. Damaged bricks should be replaced promptly to maintain the stove’s efficiency and safety.
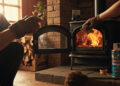
Glass Door Cleaning
A clear view of the fire is one of the great pleasures of wood stove ownership. Achieving a spotless, streak-free finish is simpler than you might think, provided you use the correct materials.
Achieving Crystal-Clear Results
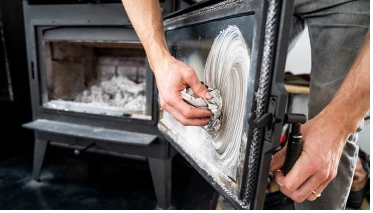
For light, daily cleaning, the cold ash method is remarkably effective. Simply dip a damp paper towel into the cool ashes within the firebox and use it to rub the glass in a circular motion. The mild abrasive quality of the ash will lift soot without scratching. For heavier buildup, apply a commercial, non-ammonia stove glass cleaner and allow it to dwell for 5-10 minutes to break down the stubborn carbon deposits. For the most tenacious spots, you may use 000-grade steel wool, but always use it damp and with a very light touch to prevent micro-scratches. Wipe the glass clean with a soft cloth or paper towel until it is perfectly transparent.
For a reliable and effortless clean, I find that a dedicated glass cleaner formulated for stoves delivers consistently brilliant results without the elbow grease.
- Product: Parker & Bailey Stainless Steel Cleaner & Polish
- Link: https://amzn.to/3KpD8o1
Accessory and Component Maintenance
A well-maintained wood stove extends beyond its firebox. The accessories and internal components are the unsung heroes that ensure efficiency, safety, and longevity. Giving them proper attention is a hallmark of conscientious stove ownership.
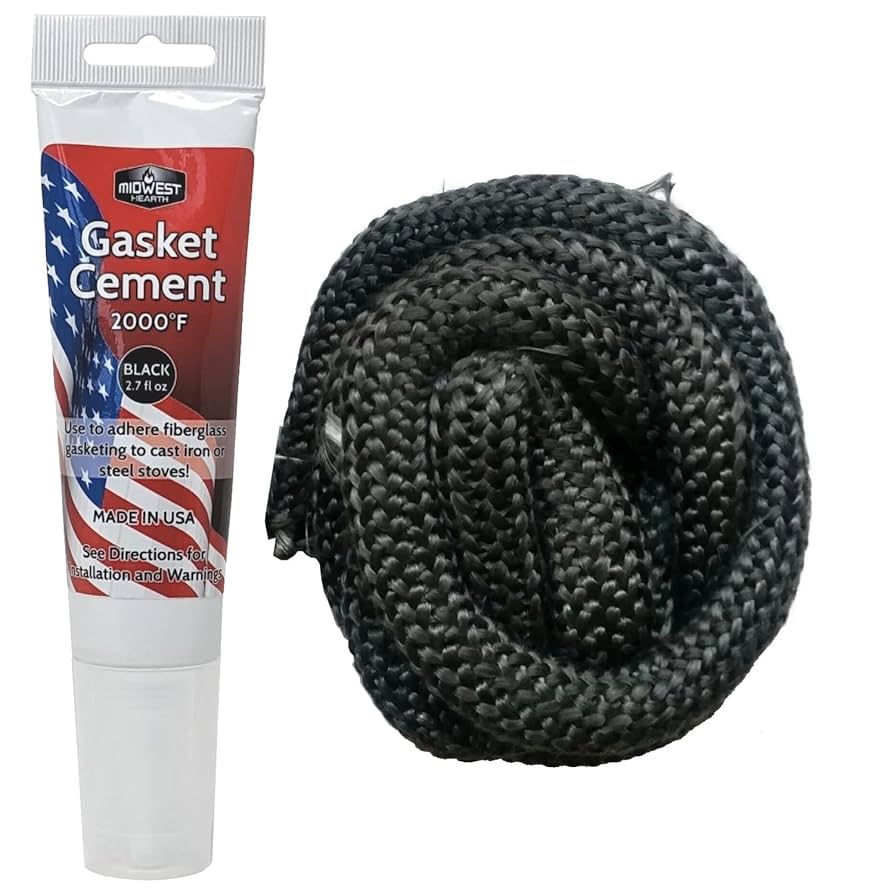
Gasket Inspection and Replacement
The door gasket is your stove’s primary seal, crucial for controlling the air intake for efficient combustion. A compromised gasket allows excess air to enter, leading to over-firing and wasted fuel.
Door Seal Integrity
To test the seal’s effectiveness, perform the simple paper test. Close the door on a strip of ordinary notebook paper and try to pull it out. If the paper slides out easily from any section of the door, the gasket requires replacement. For households that use their stove as a primary heat source, an annual inspection and probable replacement is a prudent timeline. The replacement process itself is straightforward: remove the old gasket and adhesive, apply a fresh, high-temperature silicone or cement adhesive into the channel, press the new rope gasket firmly into place, and close the door on a piece of cardboard to set the seal while the adhesive cures for the manufacturer-recommended time, typically 12-24 hours.
Baffle and Firebox Insulation
The internal components of your stove work in concert to direct heat and gases, maximizing the energy extracted from each log. Their condition directly impacts performance.
Internal Component Care
The baffle, often comprised of vermiculite panels, is located at the top of the firebox. Inspect it for wear, noting that if the panel thickness has been reduced by 50% from its original size, it should be replaced. Crack identification is critical; while small hairline cracks in the back panel may be tolerable, cracks in the side panels or those that go completely through the baffle will compromise its structural integrity and must be addressed immediately. A damaged or warped baffle disrupts the intended air distribution and flow of combustion gases, leading to poor draft, increased creosote accumulation, and significantly reduced combustion efficiency.
Exterior Surface Maintenance
The exterior of your stove deserves the same thoughtful care as its internal mechanisms. Proper cleaning preserves the finish and enhances the appliance’s aesthetic appeal.
Finish Preservation Techniques
Begin with regular dust removal using a soft brush attachment on your vacuum cleaner. This prevents abrasive particles from being ground into the surface during subsequent wiping. For painted finishes, such as the common black enamel, touch-ups may be necessary over time. Lightly sand the affected area, ensure the stove is completely cool and the room is well-ventilated, and apply a thin coat of a high-temperature paint like Senotherm, following the can’s instructions for drying and heat-curing. For polished steel or cast iron surfaces, use a metal polish that is compatible with your stove’s specific finish, applying it with a soft cloth to restore luster and provide a protective layer against moisture and fingerprints.
To keep the exterior surfaces looking their best with minimal effort, a quality polish designed for high-heat appliances is indispensable.
- Product: Parker & Bailey Stainless Steel Cleaner & Polish
- Link: https://amzn.to/3KpD8o1
Chimney and Flue System Maintenance

The chimney and flue system is the lungs of your wood stove, responsible for safely venting combustion gases out of your home. A clean, well-maintained flue is non-negotiable for both safety and efficiency, as it prevents the dangerous buildup of creosote, a highly flammable byproduct of wood combustion.
Chimney Cleaning Procedures
A systematic approach to chimney cleaning ensures the entire system, from the stove pipe to the chimney cap, is clear of obstructions and combustible deposits.
Professional vs DIY Approaches
The decision to hire a professional or undertake the cleaning yourself depends on the complexity of your system, your comfort with heights, and local regulations.
| Approach | Recommended Frequency | Key Considerations |
|---|---|---|
| Professional Sweep | At least once per year, or after every 2-3 cords of wood burned. | Essential for complex systems, multi-story homes, or if you suspect damage. Certified sweeps can also perform a Level 2 inspection, which is often a legal requirement for home insurance and real estate transactions in many regions for 2025. |
| DIY Cleaning | More frequent mid-season checks for heavy users. | Suitable for accessible, straightforward chimneys. Requires the correct tools and a rigorous adherence to safety protocols. |
For the DIY enthusiast, the correct tools are paramount. A chimney brush must be the correct size and shape (round or square) to make full contact with your flue’s interior walls. The technique involves attaching the brush to fiberglass rods and using a steady, up-and-down scrubbing motion from the top of the chimney down to the stove. Always identify all access points, such as the tee connector at the base of the chimney or a cleanout door, which will allow you to remove the dislodged creosote. The cardinal safety rule is to always use a sturdy ladder on stable ground, wear a dust mask and safety glasses, and ensure someone else is home during the procedure.
Stove Pipe Maintenance
The stove pipe, or connector pipe, is the critical link between your stove and the chimney. Its maintenance is just as vital as the chimney itself.
Connector Component Care
The care your stove pipe requires depends significantly on its type. Single-wall pipe, being a single layer of metal, cools more rapidly, leading to more creosote condensation. It requires more frequent inspection and cleaning than double-wall, or “insulated,” pipe, which retains heat better for improved draft and reduced creosote formation.
Creosote accumulation patterns offer diagnostic clues. Flaky, crusty deposits are easier to remove than the hardened, glazed stage three creosote, which is a significant fire hazard. For removal, disassemble the pipe sections if possible, taking them outside to clean with a specialized stove pipe brush and scraper. For installed pipes, use a brush from inside the home, ensuring all debris falls into the stove for disposal.
During inspection, look for corrosion, indicated by rusting or pitting, and physical damage such as dents or crushed sections. Pay close attention to the seams and joints for any signs of separation or warping. A compromised stove pipe cannot safely contain heat or sparks and should be replaced immediately to ensure the integrity of your entire wood-burning system.
To assist in keeping your stove’s glass and exterior surfaces clean between deep cleanings, a dedicated cleaner is highly effective.
- Product: Parker & Bailey Stainless Steel Cleaner & Polish
- Link: https://amzn.to/3KpD8o1
Seasonal Maintenance Schedule

A disciplined, seasonal approach to wood stove care is the cornerstone of safety, efficiency, and longevity. Just as a well-tuned instrument performs beautifully, a well-maintained stove will provide reliable warmth for many winters to come.
Pre-Heating Season Preparation
This is the most critical maintenance period. A thorough preparation ensures your system is safe to operate after its months of dormancy.
Comprehensive System Check
Before lighting the first fire of the season, a meticulous inspection is non-negotiable. Follow this 8-point checklist to ensure every component is ready for duty.
- Chimney & Cap: Visually inspect from the ground for any leaning or damage. Use binoculars to check the chimney cap for bird nests, leaves, or other blockages.
- Flue Interior: Shine a powerful flashlight up the flue from the stove opening. Look for any significant creosote buildup (more than 1/8 inch) or obstructions.
- Stove Pipe: Examine every section of the connector pipe for rust, pitting, dents, or loose seams. Ensure all locking bands are secure.
- Gaskets: Check the door gasket for brittleness or gaps. Use the “dollar bill test”—close the door on a dollar bill; if it slips out easily, the gasket needs replacement.
- Firebrick & Baffles: Inspect the interior firebricks for cracks or crumbling. Check the baffle plate for warping or damage, as this is critical for proper combustion.
- Glass: Look for any cracks, deep scratches, or a cloudy, permanent haze on the glass, which could indicate failure.
- Clearances: Verify that all combustible materials—furniture, rugs, firewood—remain at the manufacturer’s recommended safe distance from the stove.
- Smoke & CO Detectors: Test all smoke and carbon monoxide detectors in the home and replace their batteries.
For many home insurance policies and as a legal requirement for real estate transactions in many regions for 2025, a professional certification from a certified chimney sweep is necessary. This Level 2 inspection, which may include a camera scan, provides documented proof of your system’s safety.
Finally, verify your fuel storage and moisture content. Seasoned hardwood should have been split and stacked for at least 6-12 months. Use a moisture meter to ensure the wood’s internal moisture content is below 20% for a clean, hot burn.
In-Season Maintenance Routine
Consistent care during the heating months prevents minor issues from becoming major hazards and maintains peak performance.
Weekly and Monthly Tasks
The frequency of these tasks is directly tied to your usage patterns.
| Task | Frequency | Procedure |
|---|---|---|
| Ash Removal | Based on usage; typically when ash reaches 1-2 inches below the grate. | Use a metal ash shovel and dedicated ash bucket with a tight-fitting lid. Always ensure ashes are completely cold before disposal. A small bed of ash can help with coal formation, but too much will smother the fire and reduce airflow. |
| Glass Cleaning | As needed, when a light haze or soot film appears. | For daily smudges, a damp paper towel dipped in cool wood ash works wonders. For tougher buildup, use a specialized stove glass cleaner and a soft cloth. Never use abrasive pads or cleaners, as they can scratch the glass. |
| Performance Monitoring | Continuously. | Observe the smoke from your chimney. Ideally, it should be nearly invisible. Thick, dark smoke indicates incomplete combustion, often due to wet wood or insufficient air supply. Adjust air intakes accordingly and verify your wood’s moisture content. |
Off-Season Storage and Protection
Properly laying up your stove for the warm months prevents corrosion and ensures it’s ready for the first cold snap.
Long-Term Preservation
Begin your off-season routine only after you are certain the stove will not be used again for several months.
Final Cleaning and Conditioning: After the last fire has died out and the stove is completely cold, perform a thorough final cleaning. Remove all ash and debris from the firebox. Vacuum the interior to eliminate fine dust. Clean the glass one final time. To condition the cast iron or steel, you may apply a thin, protective coating of stove polish to the exterior (never the interior) to protect against rust, following the manufacturer’s instructions.
Moisture Control and Rust Prevention: Moisture is the primary enemy during the off-season. To prevent internal rust, leave the stove’s air intake controls slightly open to encourage ventilation. Placing a small, open container of baking soda inside the firebox can help absorb ambient moisture and odors.
Protective Cover Specifications and Installation: If you choose to use a cover, select one made of a breathable fabric like cotton canvas, which allows moisture to escape while keeping dust out. Avoid plastic tarps, as they trap humidity and promote condensation and rust. Ensure the stove is completely cool and dry before installing the cover.
For a superior clean on your stove’s glass and polished metal surfaces that leaves a protective finish, a dedicated cleaner is an indispensable tool for your maintenance kit.
- Product: Parker & Bailey Stainless Steel Cleaner & Polish
- Link: https://amzn.to/3KpD8o1
Troubleshooting Common Issues

Even with meticulous seasonal care, wood stoves can develop operational quirks. Addressing these common problems promptly restores performance and ensures continued safe operation.
Performance Problems
A drop in efficiency is often the first sign that something is amiss. The issues typically revolve around draft, air supply, and combustion quality.
Efficiency Restoration
Restoring your stove’s peak performance involves a systematic approach to diagnosing and correcting airflow and fuel issues.
-
Draft issues and solutions: A poor draft, characterized by smoke spilling into the room when the door is opened, can have several causes.
- Cold Chimney: A column of cold, heavy air in the chimney can prevent the warm smoke from rising. The solution is to prime the flue by holding a rolled-up piece of burning newspaper or a commercial chimney starter near the flue opening inside the stove for a minute before starting your fire.
- Negative Pressure: Modern, airtight homes can create negative pressure, starving the stove of air. Crack a window near the stove to introduce makeup air and resolve the issue.
- Blockage: A blocked chimney cap or a significant creosote buildup will impede draft. This requires immediate cleaning and inspection.
-
Air supply adjustment protocols: Your stove’s air intakes are its throttle. For optimal combustion, follow a standard protocol. When starting a fire, open all primary and secondary air controls fully. Once the fire is established and the flue temperature is up, gradually reduce the primary air to achieve a desired burn rate, while leaving secondary air supplies open to ensure the clean combustion of gases. A fire that is starved for air will burn sluggishly and produce excessive creosote.
-
Combustion optimization techniques: The single most important factor for efficient combustion is fuel quality. For the 2025 heating season, commit to using only wood that has been properly seasoned and measures below 20% moisture content on a reliable meter. Build your fires to allow for ample air circulation; avoid overloading the firebox. A small, hot fire is more efficient and cleaner than a large, smoldering one. Observe your chimney’s smoke output—it is the most telling indicator of combustion efficiency.
Physical Damage Repair
Over time, the intense heat and cycling can take a toll on your stove’s components. Knowing how to address minor damage and when to seek replacement is key.
Component Restoration
Proactive maintenance can often prevent physical damage, but when it occurs, a careful restoration is required.
-
Rust treatment and prevention methods: For superficial surface rust on the stove’s exterior, use a wire brush or fine steel wool to remove all loose rust and scale. Wipe the area clean with a dry cloth. Apply a high-temperature stove paint, following the manufacturer’s instructions for preparation and application. To prevent rust, always ensure the stove is dry and address any minor scratches in the finish before they can penetrate to the bare metal.
-
Crack repair limitations and replacement criteria: This is a critical safety area. Do not attempt to weld or repair cracks in a cast iron or steel stove body yourself. Such repairs can compromise the structural integrity and are not recognized as safe by insurance providers. A certified professional must evaluate any cracks. Hairline cracks in internal firebricks are often acceptable, but any brick that is crumbling, has pieces missing, or has a crack wider than 1/8 inch should be replaced immediately with an OEM part to maintain insulation and protect the stove body.
-
Paint matching and application precision: When touching up painted surfaces, an exact match is essential for both aesthetics and corrosion protection. Source touch-up paint directly from your stove’s manufacturer to ensure a perfect color and heat-resistance match. Proper application is everything. The stove must be completely cold and the area must be meticulously cleaned and prepped. Apply the paint in several light, even coats rather than one heavy coat to prevent drips and ensure a durable, professional-looking finish.
Safety Concern Resolution
Some issues are more than mere inconveniences; they are direct safety warnings that demand immediate and correct action.
Risk Mitigation Strategies
Vigilance and a methodical response are your best defenses against potential hazards.
-
Smoke leakage identification and correction: If you detect smoke leaking from anywhere other than the chimney—such as the door, stove pipe seams, or air controls—this indicates a failure of a seal. First, identify the source using sight and smell when the stove is operating. The most common cause is a failed door gasket. Replace it using the correct size and type of gasket cord and high-temperature gasket cement. For leaks at stove pipe joints, ensure the pipes are properly seated with the male end pointing downhill, and that all locking bands are securely tightened.
-
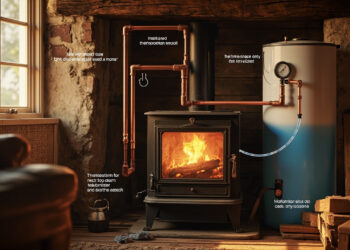
Overheating prevention and temperature management: An overfired stove, indicated by glowing red metal parts or an excessively high flue temperature, is dangerous. Immediately close the air intakes to reduce the burn rate. Never leave a stove with the air controls wide open unattended. The use of a magnetic stovepipe thermometer is a non-negotiable tool for 2025; it provides a clear visual guide to keep your stove operating within the safe, efficient temperature range, preventing damage and mitigating fire risk.
-
Professional service indicators and timing: Knowing when to call a certified technician is a critical aspect of ownership. Engage a professional immediately for: a confirmed structural crack in the stove or flue; a chimney fire (even a suspected one); the replacement of major internal components like the baffle or catalytic combustor; or any issue you cannot confidently diagnose and resolve yourself. An annual professional inspection and cleaning, as mentioned in the seasonal schedule, remains the most proactive strategy to avoid these emergencies.
For maintaining the pristine condition of your stove’s glass and polished metal trim, a specialized cleaner that removes tough soot without abrasives is essential.
- Product: Parker & Bailey Stainless Steel Cleaner & Polish
- Link: https://amzn.to/3KpD8o1
Advanced Maintenance Techniques
Moving beyond foundational care, these advanced techniques will help you extract maximum efficiency and longevity from your wood stove, ensuring it remains a centerpiece of warmth and comfort for many winters to come.
Efficiency Optimization
A truly efficient wood stove is a symphony of precise fuel management, airflow control, and thermal monitoring. Mastering these elements transforms your stove from a simple heater into a high-performance appliance.
Performance Enhancement
The pursuit of peak performance is a continuous process of measurement and adjustment.
-
Wood moisture content verification (15-20% ideal range): The single greatest factor in stove efficiency is the moisture content of your wood. For the 2025 heating season, do not rely on guesswork. A reliable moisture meter is an indispensable tool. Split a log from the core of your woodpile and test the freshly split face. The ideal range is 15-20%; wood in this range ignites easily, burns hot and cleanly, and minimizes creosote accumulation. Burning wood with a moisture content above 25% is inefficient, creates excessive pollution, and risks rapid soot buildup in your flue.
-
Airflow adjustment for complete combustion: Your stove’s air controls are not simply “on” or “off” switches. They are precision instruments for managing the burn. For a clean, efficient fire, follow this sequence: start with all air intakes fully open to establish a strong draft and bring the firebox up to temperature quickly. Once a good coal bed is established and the wood is charred, gradually reduce the primary air supply to achieve your desired heat output. Crucially, the secondary air supply (which introduces pre-heated air above the fire to burn off gases) should typically remain open to ensure a clean, secondary combustion. A fire that is starved for air will smolder and produce smoke.
-
Temperature monitoring and control strategies: Consistent temperature management is key to both safety and efficiency. A magnetic stovepipe thermometer is your guide. Aim to keep the flue gases within the manufacturer’s recommended temperature range, typically the “ideal burn” zone marked on the gauge. Operating within this range ensures gases are completely burned off while preventing the dangerous over-firing that can damage your stove and chimney. Learn the sounds and sights of your stove at different temperatures; a quiet, steady hum often indicates an efficient burn, while a roaring sound can signal over-firing.
Longevity Preservation
A wood stove is a long-term investment. Proactive preservation techniques protect that investment by slowing the inevitable wear caused by heat, moisture, and use.
Lifespan Extension Methods
These methods go beyond basic cleaning to actively combat degradation.
-
Lubrication schedules for hinges and mechanisms: The moving parts of your stove, such as door hinges and air control levers, require periodic attention to function smoothly. Use only a high-temperature, dry-film lubricant or graphite-based lubricant specifically designed for stoves. Apply a small amount to hinge pins and moving joints annually, at the start of the burning season. Avoid petroleum-based oils or sprays, as they can smoke, smell, and potentially ignite.
-
Corrosion prevention in high-humidity environments: In damp climates or for stoves installed in basements, corrosion is a persistent threat. The primary defense is to keep the stove dry and well-ventilated during the off-season. For added protection on the stove’s exterior, a thin, even application of a high-temperature paste wax on cool, cleaned surfaces can provide a protective barrier against ambient moisture. Ensure the stove is completely cold and the wax is formulated for high-heat applications to avoid unpleasant fumes.
-
Replacement part sourcing and quality verification: When a component fails, the quality of its replacement is paramount. Always source parts from your stove’s original manufacturer or a certified dealer. Using OEM (Original Equipment Manufacturer) parts guarantees a perfect fit, the correct material composition to withstand high heat, and compliance with safety standards. Avoid generic, off-brand replacements for critical components like baffles, gaskets, and firebricks, as their failure can lead to unsafe operating conditions and void your stove’s warranty.
Professional Service Coordination
Even for the most diligent homeowner, some tasks require a certified expert. Knowing when and how to engage these professionals is a critical component of advanced stove stewardship.
Expert Assistance Timing
Coordinating with a professional should be a planned event, not a panic-driven reaction.
-
Annual inspection requirements and documentation: As established in the seasonal schedule, a professional inspection and cleaning before each burning season is non-negotiable. This inspection should be thorough and documented. A reputable technician will provide a written report detailing the condition of the stove, flue, and all components, noting any observations or recommendations. Keep this documentation with your homeowner’s records; it is invaluable for insurance purposes and for tracking the long-term health of your system.
-
Certification verification for service providers: Do not entrust your stove and home’s safety to an unqualified individual. Insist on a technician who is certified by a recognized body, such as the Chimney Safety Institute of America (CSIA) in the United States or an equivalent authority elsewhere. Certification demonstrates that the individual has been trained on current safety standards, building codes, and proper installation and repair techniques. You can and should ask to see proof of certification and insurance before work begins.
-
Warranty preservation through proper maintenance: Your stove’s warranty is a valuable asset that can be voided by improper maintenance or the use of non-OEM parts. Adherence to the manufacturer’s maintenance guidelines, as outlined in your owner’s manual, is the first step. Furthermore, keeping a detailed log of your own maintenance activities (dates of cleanings, gasket replacements, etc.), alongside the annual professional inspection reports, creates a verifiable history of proper care that will support any potential warranty claim.
For maintaining the pristine condition of your stove’s glass and polished metal trim, a specialized cleaner that removes tough soot without abrasives is essential.
- Product: Parker & Bailey Stainless Steel Cleaner & Polish
- Link: https://amzn.to/3KpD8o1
Preventive Maintenance Strategies

A well-maintained wood stove is the result of diligent daily habits. By integrating these preventive strategies into your routine, you can significantly reduce the frequency and intensity of deep cleanings, ensuring your stove operates safely and efficiently day after day.
Daily Operating Practices
The choices you make each time you light a fire have a cumulative impact on creosote buildup, combustion efficiency, and the overall cleanliness of your stove’s interior.
Burn Technique Optimization
Mastering the art of the fire is the most effective form of preventive maintenance.
-
Wood selection: hardwood versus softwood performance: Your fuel choice dictates the cleanliness of your burn. Hardwoods like oak, maple, and hickory are denser, burning hotter and longer than softwoods. This high, sustained heat is crucial for maintaining flue temperatures within the ideal range, which prevents the condensation of creosote. Softwoods like pine and fir ignite easily and are excellent for kindling, but they burn faster and at a lower temperature. Relying solely on softwood often leads to a cooler flue and increased creosote accumulation. For the cleanest burn in 2025, use seasoned softwood primarily for starting fires and hardwood for sustained, hot burning.
-
Loading patterns for efficient combustion: How you place wood in the firebox influences airflow and burn completeness. Avoid haphazardly stacking logs. Instead, place logs with adequate space between them to allow air to circulate and flames to lick around each piece. For a long, slow burn, larger logs can be loaded front-to-back. For a more intense, hot fire, smaller logs loaded side-to-side or in a crisscross pattern can be more effective. The goal is always to create a configuration that allows for complete combustion, leaving behind minimal unburned material and a fine, light ash.
-
Air control settings for different burn phases: Your air controls are your primary tool for managing burn cleanliness. A fire that is starved for air will smolder and produce excessive smoke and creosote. Follow this sequence: Begin with both primary and secondary air controls fully open to establish a strong draft and bring the stove up to operating temperature quickly. Once the fire is vigorously established and the wood is fully engulfed, gradually reduce the primary air intake to control the burn rate. Crucially, the secondary air supply, which is responsible for burning off combustible gases, should typically remain open to ensure a clean, secondary burn. Only in a very low, overnight burn should you consider closing it partially, and even then, monitor for smoke.
Cleaning Prevention Methods
Preventing the conditions that lead to grime is far easier than removing it later. These methods target the root causes of buildup.
Buildup Reduction
Proactive measures drastically reduce the need for frequent, heavy scraping and brushing.
-
Wood seasoning and storage best practices: The cornerstone of a clean stove is properly seasoned wood. Wood should be split, stacked, and covered in a way that allows air to circulate freely through the pile for a minimum of six months, though a full year is often necessary for dense hardwoods. A well-ventilated woodshed is ideal. A reliable moisture meter is essential; verify that your wood has reached the ideal 15-20% moisture content before burning. Never burn green, painted, or pressure-treated wood, as they release harmful chemicals and contribute heavily to creosote.
-
Burn temperature management for creosote prevention: Creosote is a tar-like substance that forms when smoke condenses on a cool flue surface. The most effective way to prevent this is to maintain a hot flue. Regularly operating your stove at a high enough temperature to keep the flue gases within the “ideal burn” zone on your stovepipe thermometer ensures that smoke particles are completely burned off before they can exit and condense. A daily, short, hot burn can help to dry out and loosen any initial stages of creosote that may have formed during slower, overnight burns.
-
Moisture control in storage and burning environments: Keep moisture away from your stove system. Store your firewood outdoors under cover but with open sides for ventilation—never in a basement or directly against the house, where it can absorb ground moisture. When loading the stove, avoid bringing in excessive amounts of wood at once, as the sudden release of moisture from cold wood can lower the firebox temperature. Ensure the room where the stove is located is well-ventilated to support good draft and efficient combustion.
Monitoring and Documentation
A systematic approach to tracking your stove’s performance turns maintenance from a reactive chore into a proactive management system.
Maintenance Tracking
Keeping simple records provides invaluable insight into the health of your stove and helps you identify trends before they become problems.
-
Cleaning log templates and record keeping: Maintain a simple logbook for your stove. After each cleaning session, note the date, the extent of creosote buildup (e.g., “light flaky soot” or “glazed stage 2”), and any observations about the stove’s performance. This log will help you determine the optimal cleaning frequency for your specific burning habits and wood quality.
-
Performance baseline establishment: When your stove is new or freshly cleaned and inspected, take note of its performance characteristics. How quickly does it heat up? What is the typical sound of a well-balanced burn? What is the normal appearance of the exhaust from your chimney (ideally, nearly invisible)? Establishing this baseline makes it easier to detect subtle changes that might indicate a developing issue, such as a partially blocked air intake or a failing gasket.
-
Efficiency tracking and improvement measurement: Use your wood consumption and heating output as a rough gauge of efficiency. Note how long a load of a specific wood type lasts and how well it heats your space. If you find you are using more wood for less heat, it can be a sign that your stove needs cleaning, your wood is too wet, or your burning technique needs adjustment. Tracking this over the 2025 season and beyond allows you to measure the positive impact of improvements you make to your process.
For maintaining the pristine condition of your stove’s glass and polished metal trim, a specialized cleaner that removes tough soot without abrasives is essential.
- Product: Parker & Bailey Stainless Steel Cleaner & Polish
- Link: https://amzn.to/3KpD8o1
Mastering Wood Stove Maintenance: Your Path to Safety and Efficiency
Throughout this guide, we’ve established that proper wood stove cleaning transcends basic household chores—it’s an essential practice that delivers measurable benefits across multiple dimensions. Regular maintenance ensures optimal combustion efficiency, potentially saving you 15-20% on annual heating costs while extending your appliance’s lifespan. More importantly, consistent cleaning reduces chimney fire risk by approximately 90%, directly protecting your home and family from one of the most common wood stove hazards. The environmental advantages are equally compelling, with well-maintained stoves producing up to 70% less particulate matter, aligning with 2025 EPA standards for cleaner burning.
The systematic approach outlined—from daily operating practices to seasonal deep cleaning—provides a clear framework for maintaining peak performance. By implementing the recommended tools, safety protocols, and maintenance schedules, you transform potential hazards into reliable warmth. Remember that professional inspections remain crucial for complex issues, but empowered with this knowledge, you can confidently manage routine care.
Ready to implement these strategies and ensure your wood stove operates at its peak? Share your own maintenance tips in the comments below and help fellow homeowners discover the benefits of proper wood stove care. For those seeking professional-grade cleaning solutions mentioned throughout this guide, explore our recommended tools to elevate your maintenance routine.