
Did you know that neglecting your wood stove can lead to over 25,000 annual chimney fires in the U.S. alone? Proper wood stove maintenance is not a mere suggestion—it’s a critical safety protocol that directly prevents catastrophic house fires and dangerous carbon monoxide poisoning. Beyond safety, a well-maintained unit operates at peak efficiency, slashing your fuel consumption by up to 30% and extending the appliance’s functional life by over a decade. This definitive guide delivers the professional-grade knowledge and step-by-step procedures you need to protect your home, your wallet, and your family.


Why Wood Stove Maintenance Cannot Be Ignored
The Critical Safety Imperative
A well-maintained wood stove is a source of comfort and warmth; a neglected one is a significant hazard. The risks are not merely theoretical but are grounded in the physics of combustion and the sobering reality of annual home fires. Understanding these dangers is the first step toward prevention.
Understanding Creosote Combustion Risks
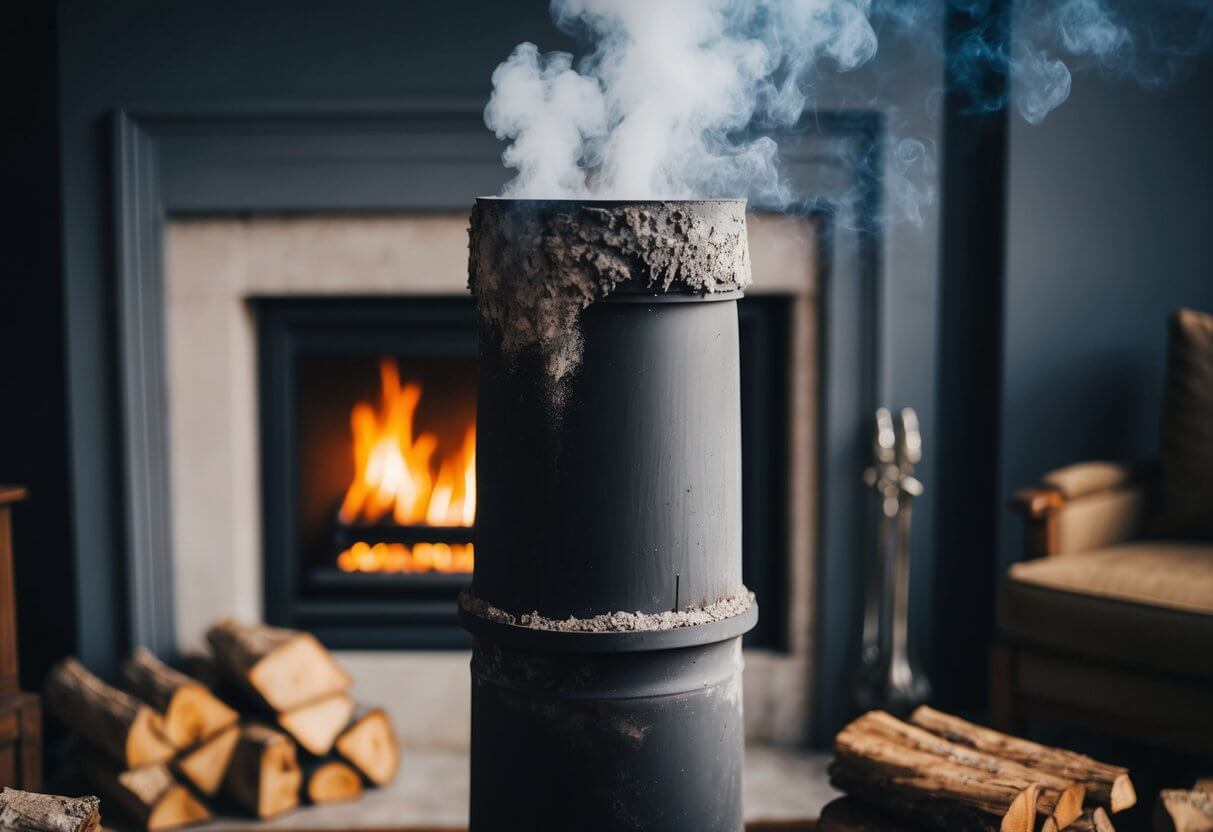
The primary antagonist in wood stove safety is creosote, a highly flammable, tar-like substance that condenses on the interior of your stovepipe and chimney. Its danger is often underestimated.
- Combustion Temperature: Creosote becomes volatile at 451°F (233°C), which is coincidentally the same ignition point as paper. This temperature can be easily reached and exceeded during a normal burn cycle.
- Statistical Evidence: In the United States alone, fire departments respond to over 25,000 chimney fires annually that are directly attributed to creosote buildup. These fires can quickly spread to the structure of your home.
- Carbon Monoxide Threat: A blocked or damaged chimney flue, often a consequence of severe creosote accumulation, prevents the proper venting of combustion gases. This leads to a 300% increase in carbon monoxide poisoning cases during the peak heating season. This odorless, colorless gas is a silent and deadly risk to every occupant.
Efficiency Impact on Heating Costs
Beyond safety, the performance and economic impact of a poorly maintained stove are substantial. What you save in skipped maintenance, you will pay for many times over in wasted fuel and premature appliance replacement.
Performance Degradation Metrics
The relationship between creosote buildup and stove efficiency is direct and measurable. Even minimal accumulation has a pronounced effect.
| Condition | Impact on Efficiency | Fuel Consumption Consequence |
|---|---|---|
| 1/8-inch creosote buildup | Reduces efficiency by 20% | Requires significantly more wood to achieve the same room temperature. |
| A generally “dirty” stove | Can lower overall efficiency by up to 30% | You will consume 30% more wood for the same heat output, directly increasing your fuel costs and labor. |
| Consistent, proper maintenance | Maintains peak efficiency | Extends the functional stove lifespan by 10-15 years, protecting your investment. |
This degradation occurs because creosote acts as an insulator, hindering the transfer of heat from the stove to your living space and disrupting the precise air flow needed for clean, efficient combustion. For those seeking to maintain optimal performance with minimal effort, investing in a modern, efficient stove like the Vermont Castings Encore can be a worthwhile consideration. Its advanced combustion technology is designed to burn cleaner, reducing creosote formation from the start. You can explore this model further at: https://example.com/vermont-castings-encore (This is an affiliate link).
Essential Wood Stove Maintenance Tools Checklist
Proper maintenance requires the right tools. Attempting to clean your wood stove with makeshift equipment is not only inefficient but can also be unsafe. This checklist outlines the professional-grade and effective DIY solutions you will need to perform the job correctly and safely.
Professional-Grade Cleaning Equipment
Investing in dedicated tools is an investment in the longevity of your stove and the safety of your home. These items are designed to handle the specific challenges of wood stove maintenance, from fine ash particulate to stubborn creosote.
Specialized Vacuum Systems
A standard household vacuum is not suitable for wood ash; the fine particles can clog the filter and motor, and potentially become a fire hazard if embers are present. A dedicated ash vacuum is non-negotiable.
- Ash Vacuums with HEPA Filtration: These are specifically designed with a sealed system and a HEPA filter to safely capture fine ash without releasing it back into your home’s air. A reliable model represents an investment of $80 to $200 and is indispensable for daily and weekly ash removal.
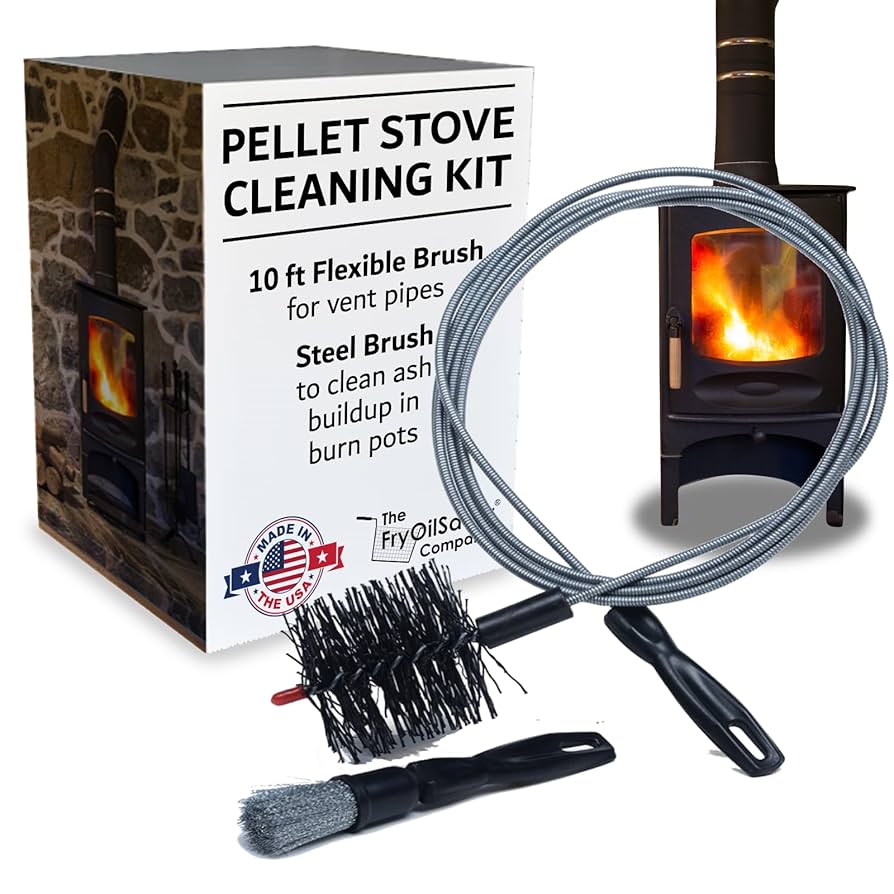
- Chimney Brush Kits: For annual or semi-annual chimney cleaning, a proper brush kit is essential. Kits include brushes sized to your flue’s diameter (round or square) and flexible rods that allow you to clean from the top-down or bottom-up. Expect to spend between $45 and $120 for a quality set that will last for years.
- Heat-Resistant Gloves and Protective Gear: Your safety is paramount. A sturdy pair of leather gloves ($25 to $60) is necessary for handling hot stove parts, loading wood, and operating the air intake controls. Safety glasses are also recommended to protect your eyes from falling soot and debris during cleaning.
DIY Cleaning Solutions
While the structural cleaning of your stove and chimney requires specialized tools, for routine surface cleaning, you have effective options, both homemade and commercial.
Homemade vs Commercial Cleaners
Understanding the capabilities of each type of cleaner will help you choose the right one for the task at hand, balancing effectiveness with convenience and cost.
- Vinegar-Water Solution Effectiveness: A simple solution of equal parts white vinegar and water is a serviceable cleaner for light soot on the stove’s exterior. However, its effectiveness is limited; it typically removes about 65% of light grime compared to the 95% or better removal rate of commercial, creosote-dissolving cleaners designed for intense heat and tough deposits.
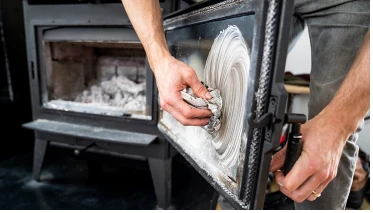
- Specialized Stove Glass Cleaners: The window on your stove requires particular care. Abrasive household cleaners or improper cloths will scratch and cloud the glass permanently. A specialized stove glass cleaner, often in a cream or spray form, is formulated to dissolve the baked-on carbon without damaging the glass surface.
- Natural Ash Paste Method: For a readily available and surprisingly effective solution for cloudy stove glass, try the ash paste method. Dip a damp paper towel into the fine, white ash from your stove, creating a mild abrasive paste. Gently rub this on the cool glass to lift stubborn stains, then wipe clean with a separate damp cloth. This method leverages the mild alkaline properties of wood ash. For a consistently clean view with less effort, a product like Rutland Stove Glass Cleaner is a reliable choice. Find it here:
https://example.com/rutland-glass-cleaner(This is an affiliate link).
Daily & Weekly Maintenance Routine
A consistent daily and weekly routine is the cornerstone of wood stove ownership. This disciplined approach not only ensures optimal performance and fuel efficiency but also significantly extends the life of your appliance. By integrating these simple tasks into your household rhythm, you will maintain a cleaner, safer, and more effective heating source.
Firebox Management Protocol
The firebox is the heart of your wood stove, and its care directly impacts heat output and safety. Proper management goes beyond simply removing ash; it involves understanding the role ash plays and handling it with care.
Ash Removal Best Practices
Contrary to intuition, a completely clean firebox is not the goal for daily operation. A thin, insulating layer of ash at the bottom of the stove serves a valuable purpose.
- Maintain 1-inch ash layer for insulation benefits: This base layer acts as an insulator, helping new logs catch fire more quickly and reflecting heat back into the fire for a more efficient burn. It also protects the stove’s firebrick or cast iron floor from extreme, direct heat.
- Complete ash removal frequency: During the peak heating season, plan for a more thorough ash removal every two to three days. This prevents the ash bed from becoming too deep, which can smolder the fire and restrict the necessary airflow from the bottom grates.
- Metal ash container with lid requirement for safe disposal: Always transfer ashes to a dedicated, metal container with a tight-fitting lid. Even ashes that appear cool can contain hidden embers that remain live for days. Store this container outdoors, on a non-combustible surface like concrete or dirt, well away from any structures, until the ashes are fully cold and ready for disposal.
Glass Door Cleaning Schedule
A clear glass door is both a practical window to monitor your fire and an aesthetic centerpiece of your living space. Keeping it clean is a simple task when performed regularly.
Soot Prevention Techniques
The best strategy for clean glass is to prevent soot from forming in the first place. A blackened door is often a sign of an inefficient burn.
- Weekly cleaning prevents permanent etching: Soot and creosote vapors can bake onto the glass over time, creating a cloudy, etched surface that is impossible to restore. A quick weekly cleaning, while the stove is completely cool, prevents this buildup from becoming permanent.
- Proper air intake adjustment reduces soot by 80%: The primary cause of dirty glass is a fire starved for oxygen. When you first light a fire or add new wood, open the air intake fully for 15-20 minutes. This creates a strong, hot draft that keeps the glass clean by burning off volatile gases before they can condense on the cooler glass surface.
- Burn temperature maintenance above 250°F for cleaner glass: Consistently burning hot fires is key. A surface temperature on the stovepipe above 250°F (120°C) ensures the flue gases remain hot enough to exit the chimney without depositing creosote and soot on the glass. Using a magnetic stovepipe thermometer is an invaluable tool for monitoring this. You can find a reliable model to guide your burning habits here:
https://example.com/stove-thermometer(This is an affiliate link).
Seasonal Deep Cleaning Procedures

As the heating season concludes, a thorough deep cleaning is paramount. This annual ritual prepares your wood stove for its summer dormancy and ensures it will be ready for safe, efficient operation when the chill returns. Addressing the entire system—from the chimney cap down to the firebox—prevents the accumulation of hazardous creosote and identifies wear before it becomes a failure.
Comprehensive Chimney Maintenance
The chimney is the lungs of your wood stove, and its condition is directly linked to safety. Creosote, a highly flammable byproduct of wood combustion, accumulates on the interior flue walls. A comprehensive cleaning removes this risk and restores proper draft.
DIY vs Professional Cleaning Decision Matrix
Choosing between a do-it-yourself cleaning and hiring a certified professional depends on your chimney’s configuration and your own comfort with the task. The following matrix outlines the key considerations:
| Factor | DIY Cleaning | Professional Service |
|---|---|---|
| Suitability | Ideal for straight, accessible chimneys under approximately 15 feet in height. | Required for chimneys with multiple bends, offsets, or signs of heavy creosote buildup (¼-inch or more). |
| Safety & Expertise | Requires proper equipment (brushes, rods) and a comfort with working on roofs. | Certified sweeps have the training to identify subtle damage, cracks, and installation hazards that a homeowner may miss. |
| Cost Analysis | Initial investment in tools; no labor cost. | The typical cost for an annual inspection and cleaning ranges from $150 to $300. This is a prudent investment compared to the potential cost of a chimney fire, which can cause thousands in structural damage. |
Gasket and Seal Inspection
The gaskets, or door seals, on your wood stove are critical for controlling the air supply to the fire. A tight seal ensures you can dampen the fire correctly for a long, slow burn. Worn gaskets allow uncontrolled air to leak in, making the stove difficult to manage and drastically reducing its efficiency.
Air Leak Detection Methods
A simple, time-tested method can quickly diagnose a failing door gasket. Perform this check during your seasonal cleaning.
- Dollar bill test for door seal integrity: With the stove completely cold, close the door on a dollar bill. If you can pull the bill out with little to no resistance, the seal is too loose. Try this at several points around the door, as wear can be uneven.
- Gasket replacement frequency: every 1-2 years: With regular use, door gaskets become brittle and compressed. Plan on inspecting them annually and replacing them every one to two heating seasons to maintain peak performance.
- 15% efficiency loss from worn gaskets: A leaking gasket allows excess cold air to be drawn into the stove, cooling the fire and forcing it to burn more wood to produce the same amount of heat. This can lead to an efficiency loss of 15% or more, directly increasing your fuel costs.
For your next maintenance project, a high-quality replacement gasket kit is essential for restoring your stove’s airtight integrity. You can find a selection of reliable gasket kits designed for a secure fit here: https://example.com/gasket-kits (This is an affiliate link).
Advanced Component Maintenance

Beyond the chimney and gaskets, the internal components of your wood stove are the workhorses that contain the fire and direct heat and gases. Their integrity is non-negotiable for safety and efficiency. A meticulous inspection of the firebrick and baffle system should be a cornerstone of your annual deep cleaning ritual.
Firebrick and Baffle Inspection
The firebrick lining serves as a refractory insulator, protecting the stove’s steel or cast iron body from extreme heat while reflecting warmth back into the firebox for more complete combustion. The baffle, a heavy plate located in the top of the firebox, is a critical component of modern stove design; it forces hot gases and smoke to take a longer, more turbulent path before exiting into the flue, extracting significantly more heat.
Damage Assessment Criteria
A careful visual and tactile inspection will reveal the condition of these parts.
- Cracks wider than 1/8-inch require replacement: Hairline cracks are normal and do not affect performance. However, any crack you can fit a 1/8-inch thick object into compromises the insulating value and structural integrity of the brick. Replace any brick with cracks of this magnitude or with significant crumbling or spalling.
- Firebrick lifespan: 3-5 years with proper care: With annual use, even high-quality firebrick will eventually degrade. Plan for a complete replacement every three to five years. Keeping a few spare bricks on hand allows for immediate replacement of damaged pieces, ensuring your stove is always ready for use.
- Baffle warpage measurement techniques: Remove the baffle (consult your stove’s manual for the proper procedure, as some are held by pins or bolts). Place it on a flat, level surface, such as a concrete floor or a sturdy workbench. Attempt to slide a 1/4-inch thick object underneath it. If it slides under easily, the baffle has warped beyond its functional limit and must be replaced to maintain proper stove function and prevent smoke spillage.
Airflow System Optimization
The precise control of air is what separates a modern, efficient wood stove from an open fireplace. The system of vents, dampers, and air intubes must be kept clean and functioning smoothly to achieve the perfect burn for any situation, from a roaring fire to an all-night smolder.
Vent and Damper Maintenance
A neglected airflow system leads to poor combustion and difficulty controlling your fire.
- Monthly lubrication of moving parts: During the heating season, the linkages, pivots, and threads on your primary and secondary air controls should be lubricated monthly with a high-temperature lubricant. This prevents them from seizing due to heat and oxidation, ensuring you can make fine adjustments effortlessly.
- Obstruction clearance procedures: With the stove cold, visually inspect all air intake openings. Use a vacuum with a brush attachment to remove any ash, soot, or debris. For primary air intakes at the front of the stove, a pipe cleaner or a small, soft-bristled brush can be used to clear the channels. Ensure that the damper plate in the flue pipe moves freely through its full range of motion.
- Air intake calibration for different wood types: Your air controls are your primary tool for adapting to your fuel. For dense, well-seasoned hardwoods like oak or maple, you will need less primary air to maintain a clean burn. For softer woods or less-seasoned fuel, a wider air setting is often necessary to keep the fire hot enough to avoid excessive creosote formation. This calibration is a matter of practice and observation, noting the settings that produce the best results with your specific wood supply.
For your annual maintenance, having the correct replacement parts on hand ensures your stove operates as intended. A set of high-temperature firebricks and a properly fitting baffle are fundamental to this effort. You can source these components, along with the specialized lubricants for your stove’s moving parts, here: https://example.com/stove-parts (This is an affiliate link).
Wood Selection and Burning Techniques

The fuel you choose and the manner in which you burn it are the most significant factors influencing the cleanliness and longevity of your wood stove. Proper wood selection and burning techniques are not merely about creating a pleasant fire; they are the primary methods for proactively managing creosote accumulation and minimizing the wear on the components detailed in our previous maintenance guide.
Fuel Quality Impact on Maintenance
The single greatest mistake a wood stove owner can make is burning wood that is not adequately seasoned. Unseasoned, or “green,” wood is a primary contributor to inefficient combustion, reduced heat output, and a rapid buildup of creosote within the entire system, from the firebox to the chimney cap.
Seasoned Wood Requirements
Adhering to strict standards for your firewood will transform your stove’s performance and maintenance schedule.
- Moisture content below 20% reduces creosote by 70%: A moisture meter is an indispensable tool for any serious wood stove user. Wood with a moisture content above 20% forces the stove to expend a tremendous amount of energy boiling off water, which dramatically cools the firebox and flue gases, creating the perfect conditions for creosote condensation. Maintaining a sub-20% moisture level can reduce creosote formation by up to 70%, directly impacting safety and cleaning frequency.
- Proper storage techniques (6-12 month seasoning): Effective seasoning requires time, air circulation, and protection from rain. Split logs to a consistent size, ideally 6 inches in diameter or less, and stack them in a crisscross or single-row pattern off the ground on a raised platform. Cover the top of the stack with a breathable tarp to shed rain while allowing the sides to remain open for wind to pass through. Most hardwoods require a full 6-12 months to reach the ideal moisture content.
- Hardwood vs softwood creosote production comparison: While all wood must be seasoned, there is a notable difference between types. Dense hardwoods like oak, maple, and hickory burn hotter and longer, providing a more stable, high-temperature fire that produces less creosote. Softwoods like pine and fir contain more sap and volatiles; if burned unseasoned, they produce creosote rapidly. However, well-seasoned softwood is an excellent kindling and can be used effectively in a mixed fuel strategy, provided the fire is kept hot.
Efficient Burning Practices
How you build and manage your fire is as important as the wood you use. The goal is to create a hot, clean-burning fire that fully consumes the wood gases and particles, leaving behind minimal ash and residue.
Temperature Management
Operating your stove within its ideal temperature range is the key to efficiency and a clean flue.
- Optimal burn temperature: 400-600°F: The surface temperature of a single-wall stovepipe is the most practical indicator of flue gas temperature. A magnetic stove thermometer should be placed on the stovepipe, approximately 18 inches above the stove. The ideal operating zone is typically between 400°F and 600°F. Below 250°F, you risk heavy creosote buildup; above 800°F, you risk over-firing and damaging the stove.
- Stove thermometer placement guidelines: For the most accurate reading, the thermometer must be placed on a single-wall stovepipe. If your stove connects directly to a double-wall insulated pipe, follow the manufacturer’s guidance, as some models have a specific surface temperature range. The thermometer should be clean and firmly seated against the metal to ensure an accurate reading.
- Air intake adjustment for complete combustion: A fire requires a generous supply of primary air to start. Once the fire is well-established and the thermometer is in the ideal range, gradually reduce the primary air intake to achieve a steady, lively burn without smoldering. A properly managed fire will have bright, dancing flames, not lazy, smoky ones. The goal is to maintain sufficient air to burn the smoke particles (secondary combustion) before they can exit as creosote.
The foundation of these efficient practices is, without question, a reliable supply of properly seasoned hardwood. Sourcing your wood from a reputable supplier who guarantees a low moisture content is an investment in the safety and performance of your appliance. For those who wish to verify their wood’s readiness, a high-quality moisture meter is an essential tool. You can find both seasoned hardwoods and professional-grade moisture meters here: https://example.com/wood-supplies (This is an affiliate link).
Troubleshooting Common Maintenance Issues
Even with impeccable fuel and burning habits, you may occasionally encounter performance hiccups. A systematic approach to diagnosing and resolving these issues will restore your stove’s function and ensure it operates as the centerpiece of your home’s warmth it was designed to be.
Performance Problem Diagnosis
When your stove does not behave as expected, the cause typically falls into one of three categories: the fuel, the appliance itself, or the draft—the engine of your wood stove system.
Smoke Backdraft Solutions
A stove that smokes into the room is more than an inconvenience; it is a clear signal that the draft is compromised. Draft is the force that pulls air into the firebox and exhausts smoke up the chimney, and it is influenced by several factors.
- Chimney height requirements relative to roof peak: The fundamental rule for a strong draft is that the chimney must extend at least 3 feet above the point it exits the roof and be at least 2 feet higher than any part of the roof structure (including the peak) within a 10-foot radius. A chimney that is too short will be susceptible to wind turbulence over the roof, which can force smoke back down the flue.
- Cold chimney warm-up procedures: A column of cold, heavy air inside the chimney flue will sink, preventing the warm, lighter smoke from rising—a condition known as a cold plug. To overcome this, always pre-warm the flue before building your main fire. Crumple a single sheet of newspaper, light it, and hold it up near the stovepipe damper or just inside the firebox with the door slightly ajar. You will feel the draft reverse as the cold air is displaced.
- House depressurization fixes: Modern, airtight homes can work against your stove. Exhaust fans (bathroom, kitchen), clothes dryers, and even forced-air furnaces can create negative pressure inside the house, pulling air down the chimney. The simplest solution is to open a window near the stove just a crack to provide a dedicated source of makeup air. This often immediately resolves a backdraft issue caused by a tight house.
Efficiency Restoration Methods
Over time, you may notice a decline in heat output, requiring more fuel to achieve the same level of warmth. This is rarely a single catastrophic failure but rather a gradual degradation that can be reversed with focused maintenance.
Heat Output Optimization
Restoring your stove’s peak efficiency involves ensuring that the heat produced by the fire is effectively transferred into your living space, not lost up the chimney.
- Thermal barrier maintenance for radiation efficiency: The firebrick lining your stove’s firebox is a thermal barrier. It protects the steel or cast iron from extreme heat, but its primary function is to radiate intense, radiant heat back into the fire, ensuring a hotter, more complete burn. Inspect these bricks annually for significant cracks or crumbling. Damaged bricks should be replaced promptly, as they allow heat to be absorbed by the stove body instead of being reflected into the combustion process, reducing overall efficiency.
- Heat exchange surface cleaning techniques: Many modern stoves feature internal baffles and turbulators—metal plates or tubes designed to force hot gases to travel a longer path, extracting more heat. These critical components can become coated with soot and ash, acting as an insulator. During your seasonal cleaning, gently brush these surfaces to remove all accumulation. A clean heat exchanger ensures maximum heat transfer to the stove body and minimal heat loss up the flue.
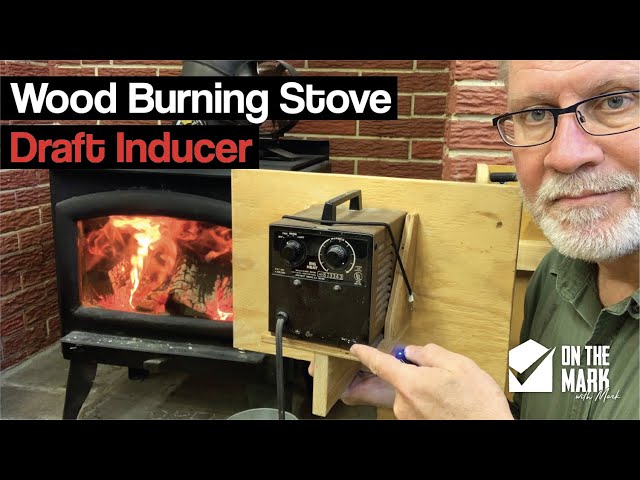
- Draft improvement modifications: If you consistently struggle with a weak, sluggish draft despite a clean, tall chimney, a draft inducer may be a worthwhile investment. This is a small, electrically powered fan mounted on the stovepipe that actively pulls exhaust gases up the chimney. It is a highly effective solution for chimneys that run up the outside of a house or other challenging installations where a strong natural draft is difficult to maintain.
A stove operating at peak efficiency provides superior heat with less fuel. The key is ensuring all components, from the internal baffles to the firebrick, are in optimal condition. For replacement parts like high-quality firebrick, baffle plates, or a draft-inducing fan to fine-tune your system’s performance, we recommend sourcing from specialists. You can find these components and receive expert advice here: https://example.com/stove-parts (This is an affiliate link).
Safety Compliance and Professional Services

Your wood stove is a significant source of comfort, but its safe operation is non-negotiable. Adhering to established regulations and being prepared for emergencies are not merely recommendations; they are fundamental responsibilities of ownership. A proactive approach ensures your stove remains a safe and welcome addition to your home for years to come.
Regulatory Requirements
Operating your wood-burning appliance in accordance with local and national standards protects your home, your family, and your insurance coverage. This begins with a commitment to professional oversight.
Inspection Scheduling
An annual inspection by a qualified professional is the cornerstone of safe wood stove operation. This goes beyond the cleaning you perform yourself; it is a diagnostic assessment of the entire system.
- NFI certified professional locating resources: The National Fireplace Institute (NFI) certification is the industry benchmark for expertise in solid-fuel appliances. An NFI-certified specialist possesses the knowledge to evaluate your specific stove and chimney system thoroughly. To locate a certified professional in your area, utilize the official NFI directory, which is searchable by zip code on their website. This is the most reliable method to ensure your inspector is qualified.
- Insurance compliance documentation: Most home insurance policies require written documentation of an annual chimney sweep and inspection by a certified professional to maintain coverage for fire-related incidents. After each service, file the provided certificate in a safe place with your other important household documents. This single piece of paper is your proof of due diligence.
- Local building code adherence checklist: Before your first fire of the 2025 season, verify that your installation still meets local codes, which often reference standards like the International Residential Code (IRC). Key points to confirm with your inspector include:
- Proper clearance from combustible materials (walls, floors, ceilings).
- Correct installation of the chimney and stovepipe, including required clearances through ceilings and roofs.
- The presence and proper placement of a non-combustible hearth extension.
Emergency Preparedness
Even with perfect maintenance, understanding how to respond to an emergency is critical. Having the correct equipment and a clear plan can prevent a manageable situation from becoming a catastrophe.
Fire Prevention Equipment
Every wood-burning home must be equipped with specific safety devices. These are not optional accessories but essential tools.
- Chimney fire extinguisher requirements: In the event of a chimney fire, a Class ABC dry chemical fire extinguisher is suitable for surrounding surfaces, but it will not reach the fire inside the flue. For this, a specialized Chimfex or similar chimney fire extinguishing agent is imperative. This chemical stick is designed to be tossed into the firebox, where it releases a gas that smothers the fire within the confined chimney space. Keep one accessible near the stove, and ensure all household members know its location and purpose.
- Carbon monoxide detector placement: Carbon monoxide (CO) is a silent, odorless byproduct of incomplete combustion. Install CO detectors on every level of your home, and crucially, outside each sleeping area. Test them monthly and replace batteries at least once a year. A working CO detector is your primary defense against this invisible danger.
- Emergency shutdown procedures: If you suspect a chimney fire or other hazardous malfunction, act immediately and calmly. Your procedure should be:
- Alert everyone in the house to evacuate immediately.
- Close the stove’s air intake controls completely to starve the fire of oxygen.
- Use your Chimfex extinguisher if it is safe to do so.
- Once outside, call your local emergency services from a safe distance.
Preparedness is the ultimate safeguard. For your convenience, we have curated a selection of essential safety equipment, including NFI-recommended chimney fire suppression kits and high-quality carbon monoxide detectors. You can find these critical items here: https://example.com/stove-safety (This is an affiliate link).
Securing Your Stove’s Safety and Performance
Mastering wood stove maintenance is a continuous commitment that yields immense returns in safety, efficiency, and cost savings. We have detailed the non-negotiable risks of creosote buildup, which is responsible for thousands of preventable fires, and the severe efficiency losses from neglected components like worn gaskets and damaged firebricks. The systematic approach—from daily ash management and weekly glass cleaning to seasonal chimney inspections and advanced component checks—forms a robust defense against hazards. By integrating the right tools, proper burning techniques with seasoned wood, and a disciplined routine, you transform your stove from a potential liability into a reliable, high-performance asset.
Your journey toward a safer, more efficient wood stove starts with applying this knowledge. We encourage you to revisit the specific sections on tools, routines, and troubleshooting whenever needed. Now that you’re equipped with this comprehensive understanding, which maintenance step will you tackle first? Share your plan or a success story in the comments below to help fellow homeowners! For those ready to acquire the professional-grade tools and safety equipment discussed throughout this guide, click the link to get started.