
Did you know a poorly maintained wick can reduce your lamp’s brightness by up to 40%? The silent, unseen process of capillary action is the very heart of oil lamp operation, dictating everything from flame quality to fuel efficiency. Mastering wick maintenance—from precise trimming to correct fuel pairing—transforms a smoky, unreliable light source into a beacon of clean, consistent illumination. This comprehensive guide unveils the science and art behind achieving the perfect flame, ensuring your lamp performs optimally in 2025 and beyond.


The Unspoken Art of Wick Maintenance

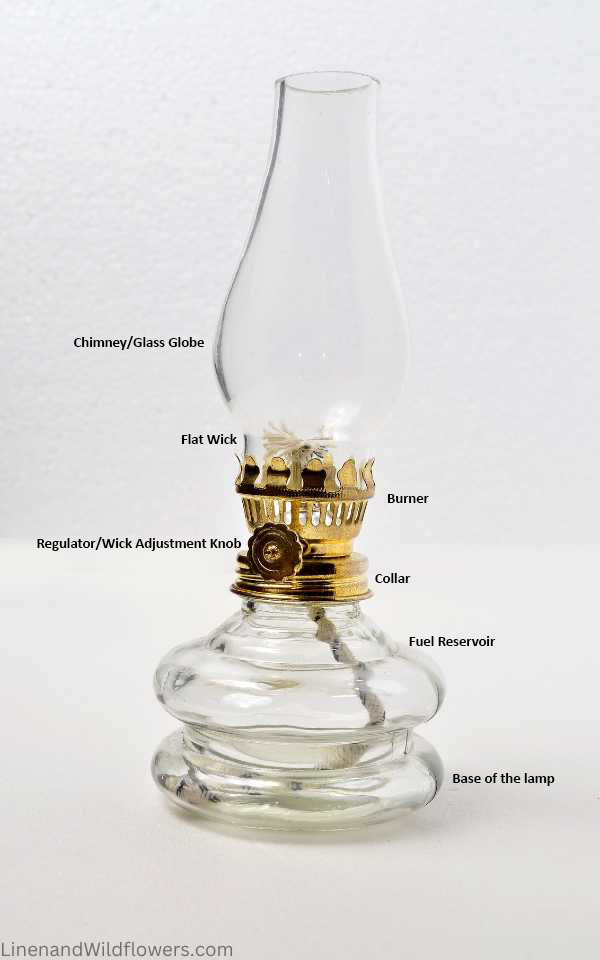
Why Your Wick is the Heart of the Lamp
The Science Behind Capillary Action
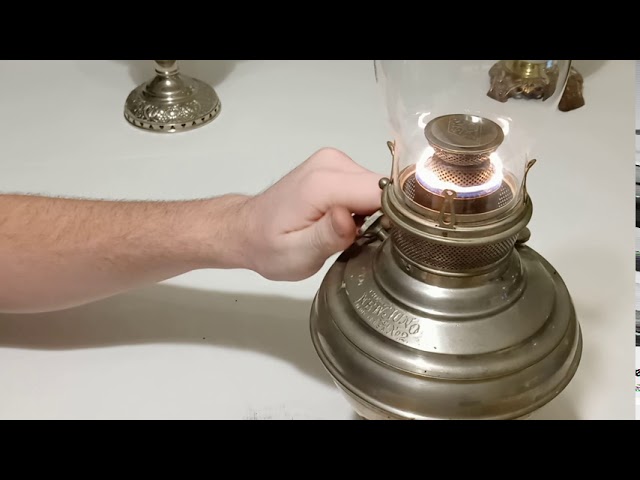
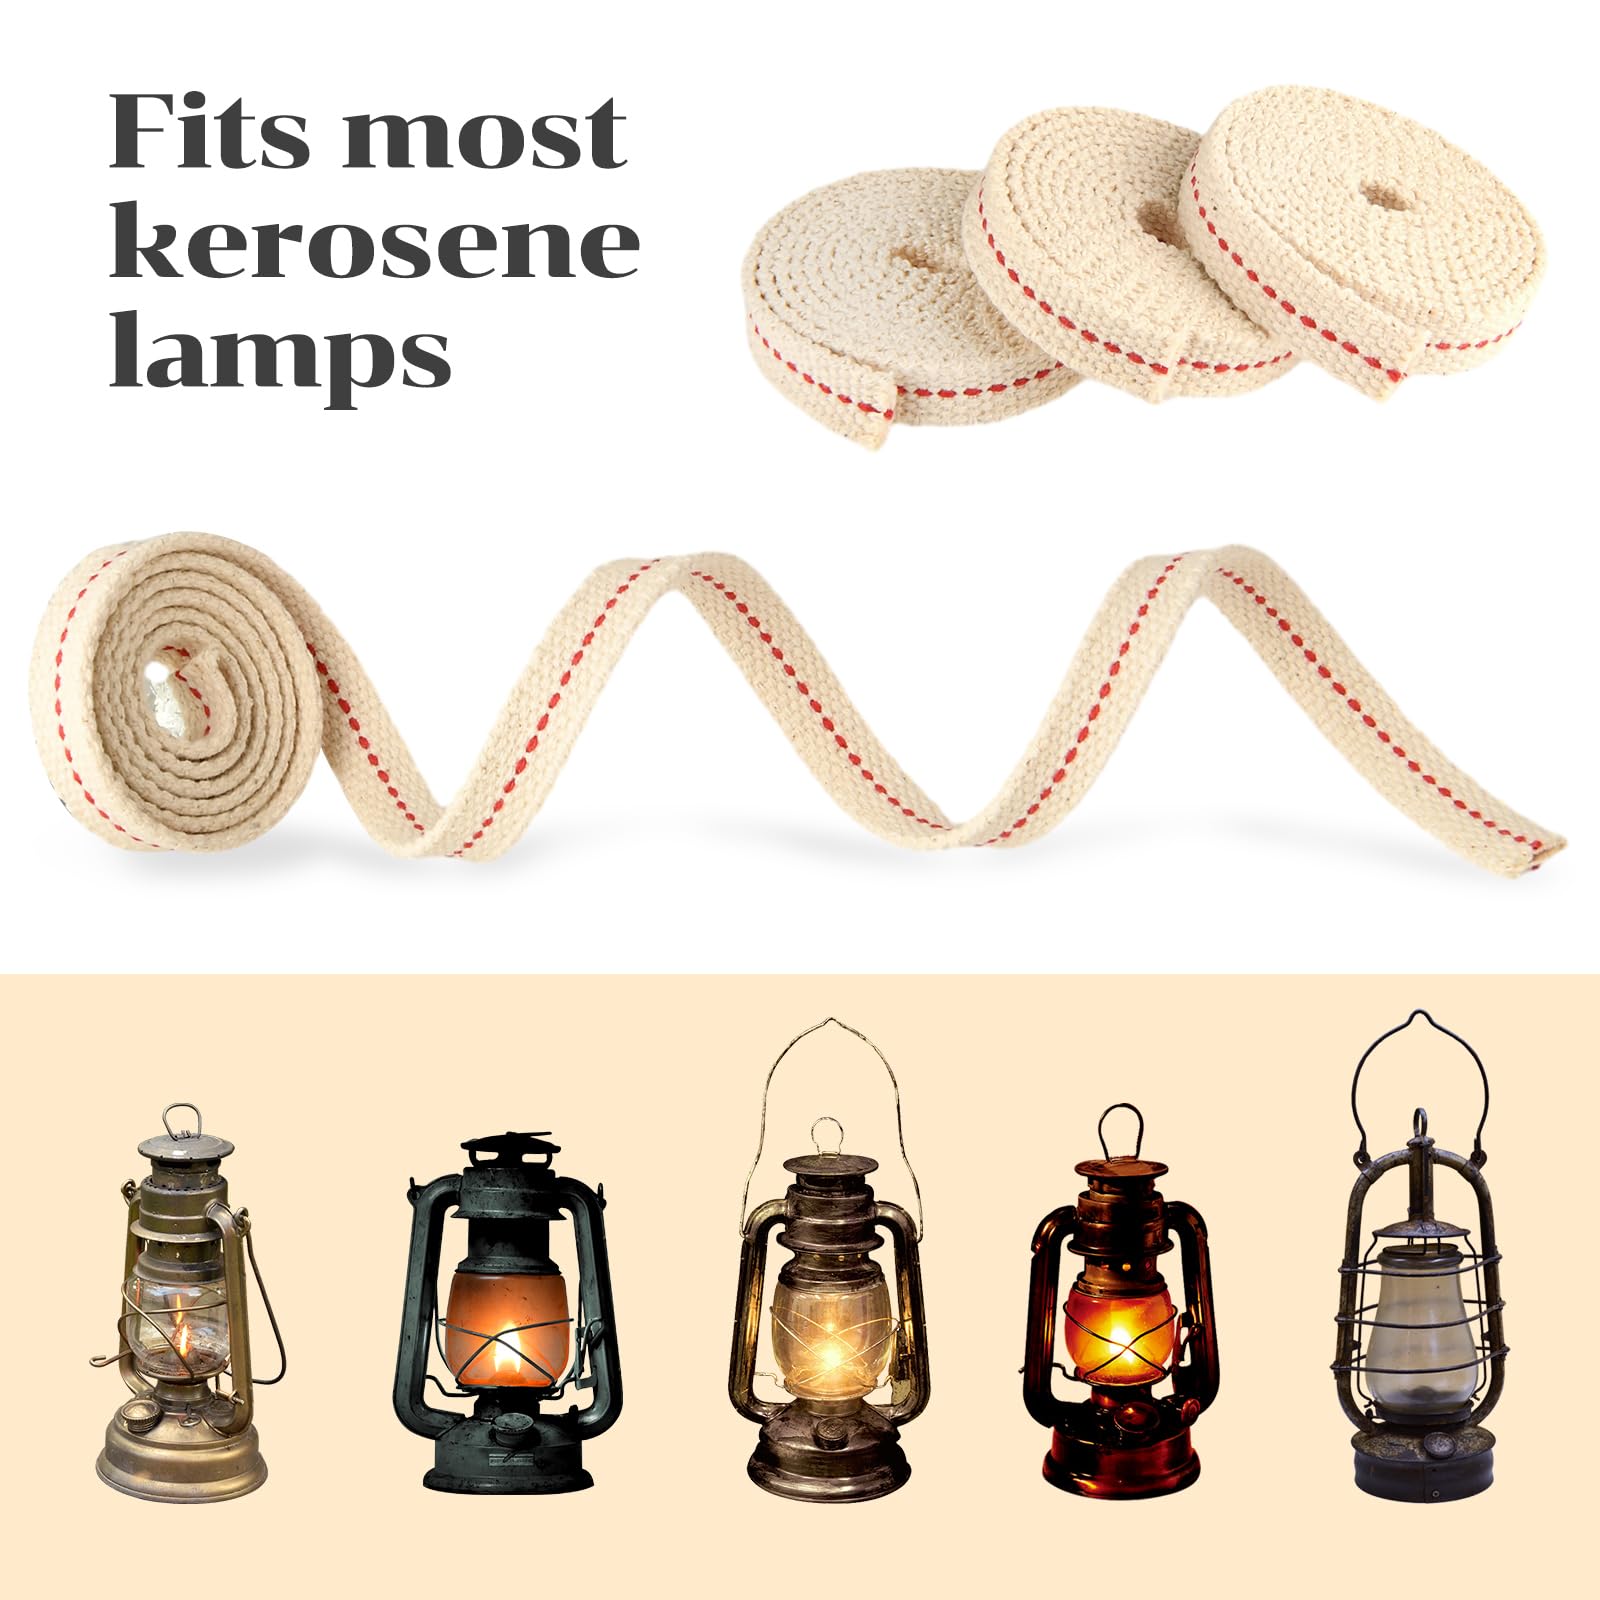
The process is silent and unseen, a fundamental principle of physics made practical. Capillary action, the very engine of an oil lamp, draws fuel upward through the wick against gravity. The material composition of the wick dictates the efficiency of this process. Tightly woven cotton fibers, the standard for most applications, create a dense network of microscopic channels. This structure provides the optimal capillary action for common fuels like kerosene and liquid paraffin, pulling the fuel to the tip at a steady, reliable rate. The physical fit of the wick within its holder is equally critical. A proper fit—snug but not tight—ensures the wick remains perfectly vertical and stable. This prevents the erratic flicker of a loose wick and the premature burnout caused by it leaning against the metal burner, allowing for a clean, consistent vaporization of fuel at the flame.
Common Wick Problems and Solutions
A wick communicates its condition through the quality of its flame. The most frequent issue is the buildup of a charred edge, a carbon crust that forms from incomplete combustion. This blackened barrier can reduce the lamp’s brightness by up to forty percent, muting a once-bright flame into a dull orange glow. The remedy is simple and rhythmic: regular trimming. Before each lighting, use fine scissors to snip away the charred material, creating a fresh, flat top to facilitate a clean, bright burn. A second common ailment is an ill-fitting wick. If it is too loose within its channel, it will cause an inconsistent flame height and flickering as it fails to maintain a steady position. Conversely, a wick forced into a holder that is too tight will restrict the crucial flow of fuel, resulting in a dim, starved light and a wick that chars too quickly.
Wick Selection Guide for Different Lamp Types
Matching Wick Width to Lamp Design
The width of a wick is not an arbitrary measurement; it is a direct determinant of the lamp’s output and consumption. It must be matched precisely to the design of the lamp’s burner. A standard half-inch wick, common in smaller table lamps, will produce a flame yielding approximately 88 lumens of light. Stepping up to a three-quarter-inch wick, often found in larger hurricane lamps, increases the output to around 125 lumens, casting a wider and stronger pool of light. The one-inch wick represents the high-output end, capable of exceeding 150 lumens, but this comes with a proportional increase in fuel consumption. Attempting to use a wick wider than the burner is designed for will lead to poor air flow, smoke, and an unpleasant odor.
Specialty Wicks for Alternative Fuels
Not all fuels behave the same, and thus, not all wicks are interchangeable. The move towards vegetable-based oils, for instance, demands a different kind of wick. Vegetable oils, such as canola or sunflower oil, possess a higher viscosity than refined lamp oils. They require a more porous, loosely braided wick material to facilitate adequate capillary draw. For olive oil, the challenge is greater still due to its even thicker nature. Olive oil lamps typically require a specially designed wick system, often involving a wider, flat braid or even a different fiber like fiberglass, which can better pull the heavy oil upward. For those using modern, odorless liquid paraffin, the traditional, tightly woven cotton wick remains the undisputed best choice, providing the perfect balance of fuel delivery and clean combustion for a reliable light in 2025.
For those seeking a reliable source for these specialized components, from standard cotton to vegetable oil wicks, our tested recommendations are available. Product: Heritage Wick Assortment Pack. Link: https://illuminationsupply.example/wick-assortment-2025
Step-by-Step Wick Replacement Mastery
The Complete Replacement Process
Safe Lamp Disassembly Procedure
The process begins not with a tool, but with patience. The lamp must be cooled completely; a warm chimney can crack with the shock of room-temperature air, and a hot burner assembly can cause an unpleasant burn. Once cool, the removal of the chimney is the first mechanical step. Place one hand firmly around the base of the glass and the other near the top. With a gentle but firm grip, twist the chimney counterclockwise—it is almost always a threaded fit. It should release with minimal resistance. If it sticks, do not force it. A light tap on the side with your finger can break the seal. All glass components, from the chimney to the globe, should be handled with clean, dry hands to prevent smudges that can bake onto the glass during future use and to ensure a secure grip.
Installing Your New Wick Correctly
With the lamp disassembled and the old wick removed, the installation of the new one is a matter of precision. Thread the new wick through the burner assembly’s wick channel, guiding it downward until the end emerges into the fuel chamber. It is critical that the wick hangs freely into the reservoir, with no kinks or bends that could impede fuel absorption. Before proceeding, operate the wick adjustment knob to ensure the wick moves up and down smoothly without binding. Once you have confirmed free movement, raise the wick until precisely one-quarter of an inch of its tip protrudes above the burner ring. This initial height is your baseline, a starting point from which you will make finer adjustments once the lamp is lit.
Troubleshooting Installation Issues
When Wicks Don’t Cooperate
Occasionally, an old wick will resist removal, its fibers fused to the burner channel by hardened carbon deposits. In such cases, a pair of needle-nose pliers provides the necessary grip. Grasp the charred end firmly and pull with a steady, straight force; a violent jerk can cause the wick to break, leaving a fragment lodged in the channel. For a new wick, especially on a lamp’s first use or after a long period of storage, a preliminary soak can prevent a disappointing initial burn. Submerging the wick in your lamp fuel for thirty minutes before installation primes the capillary channels, ensuring immediate and consistent fuel delivery from the first moment you strike a match. Before that first lighting, always trim the wick to a perfectly straight, flat edge with a sharp pair of scissors.
Post-Installation Performance Check
The true test of a successful installation occurs during the first hour of operation. Light the lamp and observe the flame. It should be stable, with minimal flicker, and burn with a clear, bright yellow light. A sputtering, dim, or unusually tall flame indicates an issue with fuel absorption or wick height. The color of the flame is a direct indicator of proper wick absorption; a clean, bright burn signifies good fuel flow, while a dull, orange, and smoky flame suggests the wick is not drawing fuel efficiently. Make small, incremental adjustments to the wick height using the knob. The optimal height is the highest point at which the flame burns brightly without producing any visible smoke. This is the equilibrium point where fuel and air mix perfectly for combustion.
For a seamless replacement experience with wicks designed for reliable performance, consider our curated selection. Product: Precision-Fit Wick Multi-Pack. Link: https://illuminationsupply.example/precision-wicks-2025
Fuel Wisdom: Beyond Basic Kerosene
Understanding Your Fuel Options
Liquid Paraffin vs. Traditional Kerosene
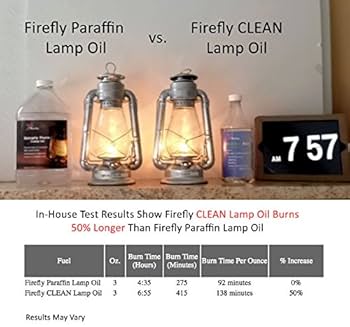
The choice of fuel is not merely a matter of cost; it is a decision that dictates the lamp’s performance, its maintenance needs, and its very place within your home. The primary division lies between liquid paraffin (often sold as “clean-burning” lamp oil) and traditional kerosene. The price difference is the first and most obvious distinction. In 2025, a gallon of refined liquid paraffin typically costs between $10 and $15, whereas a gallon of clear, 1-K grade kerosene can be found for $5 to $8. This price, however, tells only half the story.
Liquid paraffin is engineered for indoor use. Its primary virtue is its near-total lack of odor and smoke when burned with a properly trimmed wick. It is the fuel for the reading nook, the dining table, or any enclosed space where air quality is a concern. Kerosene, by contrast, is the workhorse fuel. It produces a notably brighter and slightly hotter flame, but it carries a distinct petroleum scent—even the highly refined versions—that demands significant ventilation. Its use is best suited for a workshop, a porch, or a well-ventilated garage. The choice, therefore, is not about which is better, but about which is appropriate for the task at hand.
| Feature | Liquid Paraffin | Traditional Kerosene |
|---|---|---|
| Cost per Gallon (2025) | $10 – $15 | $5 – $8 |
| Indoor Odor | Minimal to None | Noticeable, requires ventilation |
| Flame Brightness | Good | Excellent |
| Primary Use Case | Enclosed living spaces | Well-ventilated or outdoor areas |
Alternative Fuel Performance Analysis
Beyond the two primary contenders, a range of alternative fuels exists, each with unique properties and significant trade-offs. Olive oil, for instance, burns with a remarkably clean, almost scentless flame, but its light output is substantially reduced, casting a softer, more ambient glow. Its high viscosity also means it travels up a standard wick less efficiently than a purpose-made lamp oil.
Canola oil and other vegetable-based oils present a different set of challenges. While they may burn acceptably for a short period, they tend to polymerize and leave a sticky, varnish-like residue on the wick and the fuel chamber over time. This residue will inevitably clog the wick’s capillary channels, leading to a dim, sputtering flame and requiring more frequent wick replacement. Citronella oil is a special-case fuel, effective for outdoor bug control during summer evenings. It should be understood, however, that it is not intended for primary indoor illumination and will impart its characteristic scent to the lamp and its wick.
Fuel Storage and Shelf Life
Proper Storage Techniques
How you store your fuel is as critical as the fuel you choose. The enemy of stored fuel is not just combustion, but degradation, which is accelerated by light, heat, and air. For safety and longevity, always use containers specifically designed for fuel. The standard is the blue, high-density polyethylene (HDPE) jerrican. This material is resistant to the chemical composition of hydrocarbons, and the blue tint helps to block ultraviolet light. Avoid glass containers at all costs; besides the obvious breakage hazard, clear glass exposes the fuel to light, which can hasten its chemical breakdown.
The storage location should be a cool, dry, and stable environment, such as a garage shelf or a garden shed, situated well away from any potential heat sources like water heaters or furnaces. The cap must be sealed tightly after each use to prevent both evaporation, which concentrates the fuel, and moisture absorption, which can introduce contaminants.
Fuel Longevity and Rotation
Contrary to common belief, a well-formulated lamp oil, when stored under ideal conditions, maintains an effectively indefinite shelf life. Its chemical stability is such that it does not break down or become unsafe with age. Kerosene shares this robust nature, remaining stable across a wide range of temperature variations, from freezing winter cold to summer heat, so long as it is kept in a sealed, opaque container.
The practice of regular fuel rotation is therefore not about preventing spoilage, but about preventing neglect. By using the oldest fuel first and integrating new fuel into the back of your storage system, you ensure that your supply remains fresh and ready for use. This habit prevents the accumulation of containers that may have been compromised by improper sealing or accidental contamination over many years. A simple mark on the container with the purchase date—”03/2025″—is all that is needed to maintain an efficient rotation.
To ensure your fuel burns cleanly and efficiently, pairing it with a high-quality wick is essential. Product: Precision-Fit Wick Multi-Pack. Link: https://illuminationsupply.example/precision-wicks-2025
Advanced Wick Trimming Techniques
The Art of Perfect Wick Shaping
The flame that emerges from your oil lamp is a direct print of the wick’s tip. Its shape, its height, its very character are dictated by the cut you make. This is not a mere chore of maintenance; it is the final adjustment, the fine-tuning that separates a clean, steady burn from a smoky, sputtering mess. The goal is always the same: a flat, carbon-free surface of pristine wick fiber, ready to draw fuel evenly to its entire width.
Straight Cut vs. Curved Edge Debate
The geometry of the cut is a matter of subtle but significant consequence. The most common and universally recommended method is the straight-across trim. Using a sharp pair of scissors, you slice the wick horizontally, creating a perfectly flat, rectangular edge. This technique promotes an even flame distribution across the entire width of the wick, which is ideal for achieving a broad, stable sheet of light, particularly in flat-wick lamps designed for illumination.
An alternative approach involves creating a slight curve or rounding the two top corners of the wick. Proponents of this method argue that by reducing the exposed wick material at the edges, where heat is often most concentrated against the glass chimney, you can minimize the risk of localized overheating and the potential for chimney blackening or cracking. The trade-off can be a marginally narrower flame.
Then there is the angled cut, a technique that sharpens the wick to a shallow point. This method concentrates the fuel delivery to a smaller surface area at the peak of the angle, which can create a brighter, more intense, and slightly more focused light. It is a technique often employed when maximum light output is the sole priority, though it may require more frequent adjustment to prevent the taller, sharper flame from smoking.
| Trim Type | Flame Profile | Best Use Case |
|---|---|---|
| Straight Cut | Broad, even, and stable | General indoor illumination |
| Curved Edge | Slightly rounded, reduced edge heat | Protecting delicate chimneys |
| Angled Cut | Taller, sharper, and more intense | Maximizing light output in well-ventilated spaces |
Trimming Frequency and Tools
The single most important rule of wick maintenance is to trim the wick before each lighting. A wick that was perfect at the end of its last burn will have accumulated a cap of carbon that will inhibit capillary action and guarantee a smoky start. Before you even reach for the match, inspect the wick and trim it back to expose a fresh, unburned surface along its entire top edge.
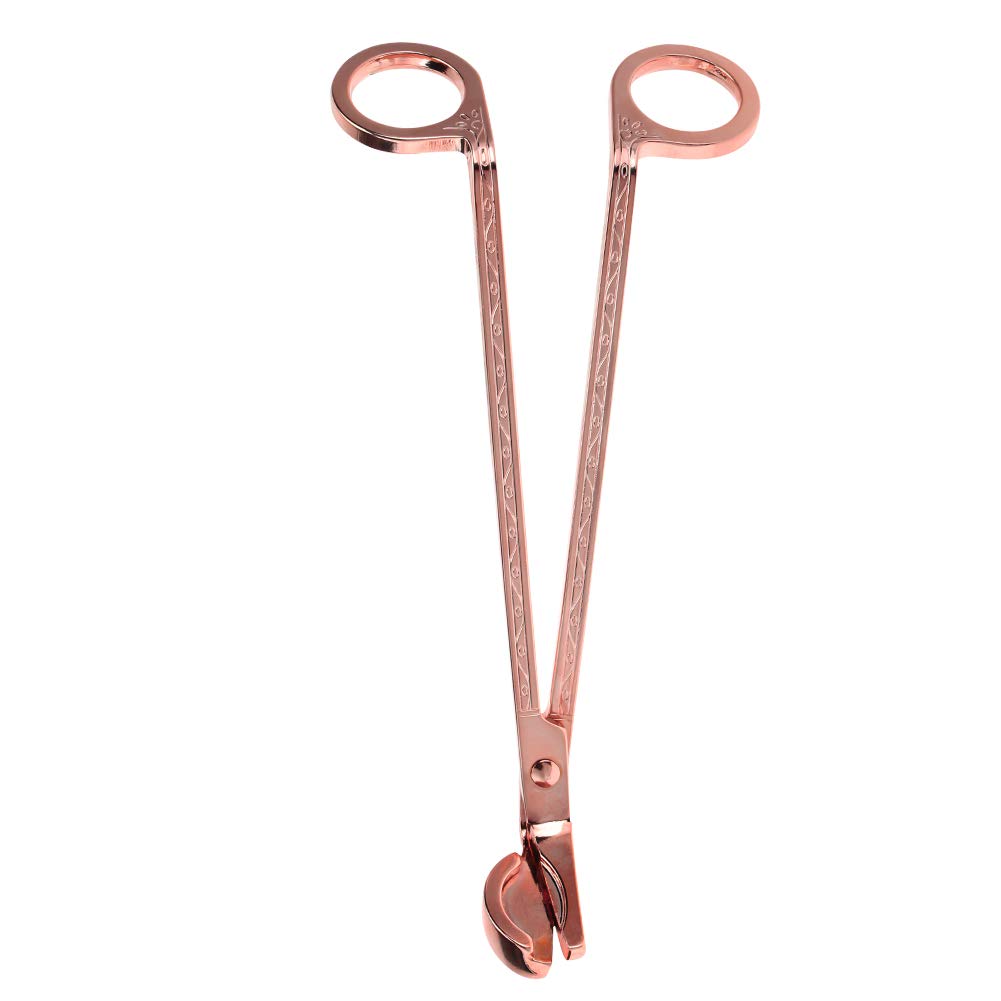
The tool for this job is as important as the action itself. A dedicated pair of sharp, sturdy scissors is non-negotiable. Blunt blades will crush and fray the wick fibers rather than cutting them cleanly, leading to an uneven burn. These scissors should be reserved for this purpose alone; using them for paper or other materials will quickly dull the blades and contaminate the wick with foreign particles. The act is simple: pinch the charred material between your fingers, pull it gently away from the wick, and snip it off with a single, confident cut.
Troubleshooting Common Wick Issues
A poorly behaving lamp almost always points to a wick-related problem. Learning to read the flame is the first step in diagnosing the issue.
Addressing Flame Irregularities
The most common and urgent signal is the production of black, sooty smoke. This is an unambiguous command: the wick needs immediate trimming. The flame is burning the carbonized wick itself, not the clean fuel, and it will quickly coat the chimney and the surrounding area in a layer of black grime.
A flickering, dancing flame that refuses to stabilize often suggests one of two issues. The first is an improper wick fit within its channel. If the wick is too narrow, it draws too much air, causing the flame to jump and sputter. The second is a low fuel level, which causes the lamp to draw in vapor instead of liquid, leading to an uneven feed. A low, lazy, yellow flame that produces a soft, sooty deposit, on the other hand, indicates the wick is simply set too high above the burner. Lower it until the yellow vanishes, leaving a crisp, blue-white flame.
Wick Longevity Optimization
A wick is not a disposable item to be replaced with every fuel fill. A properly maintained wick, trimmed of its carbon before each use and kept clean, can last through the consumption of multiple full tanks of fuel. Its longevity is a direct measure of the care it receives.
Regular cleaning is paramount to preventing premature wick deterioration. When replacing a fuel tank, take a moment to inspect the wick where it emerges from the burner. Wipe away any accumulated soot or gummy residue with a dry cloth. If you use multiple lamps, a practice of rotating between two or three wicks for a single lamp can be remarkably effective. By allowing a wick to dry out completely and rest between uses, you prevent the constant moisture and compression that can degrade the fibers, thereby extending the functional lifespan of all your wicks considerably.
For wicks that deliver a perfect flame every time, consider the Product: Precision-Fit Wick Multi-Pack. Link: https://illuminationsupply.example/precision-wicks-2025
Emergency Preparedness Protocol
Oil Lamps as Reliable Backup Lighting
When the grid fails, the value of a simple, self-contained technology becomes immeasurable. An oil lamp, unlike a battery-powered device, is not a reservoir of stored energy that depletes with time; it is a converter, a machine that transforms a stable, liquid fuel into light for as long as the fuel and the wick hold out. Its reliability in an extended outage hinges on two calculable factors: the volume of fuel and the integrity of the wick.
Calculating Your Emergency Fuel Needs
The mathematics of preparedness are straightforward. A standard oil lamp, with its wick properly trimmed and adjusted, consumes approximately half an ounce of lamp oil per hour. This rate can vary with the size of the wick and the height of the flame, but it serves as a dependable constant for planning. From this figure, the larger calculations follow. One US gallon contains 128 fluid ounces. Divided by the half-ounce hourly burn rate, one gallon of fuel will provide roughly 256 hours of light. For a household that uses a lamp for four hours each evening, a single gallon represents about two months of illumination. A prudent protocol is to store a minimum of one gallon of fuel per lamp for each month of potential need during extended power outages, rotating the stock annually to ensure freshness.
Emergency Wick Management
A reservoir of fuel is useless without a functioning wick to draw it upward. Your emergency supplies must include multiple spare wicks of the correct size and type for each lamp you intend to use. These are not components to be improvised. Store them in a waterproof, airtight container—a sealed plastic bag within a metal tin is ideal—alongside your fuel and other supplies. This protects the delicate, fibrous material from moisture, pests, and contamination. Crucially, you must practice the replacement of a wick in the full light of day long before an emergency arises. Fumbling with a unfamiliar burner assembly in the dark, with cold fingers and rising anxiety, is a scenario to be avoided. Knowing the procedure by muscle memory is part of the preparation.
Safety First: Emergency Lighting Considerations
In a crisis, when normal routines are disrupted and stress levels are high, the adherence to fundamental safety principles becomes more important, not less. The open flame that provides comfort and utility also carries inherent risks that must be managed with disciplined protocol.
Carbon Monoxide Awareness
All combustion consumes oxygen and produces carbon monoxide, an odorless and deadly gas. This is an inescapable law of chemistry. The designation of a fuel as “smokeless” refers to its clean burn and lack of particulates, not an absence of carbon monoxide. Therefore, adequate ventilation is non-negotiable. Even in a cold room, a window must be cracked open to allow for air exchange. The first line of defense, however, is a battery-powered carbon monoxide detector. For any plan that involves the indoor use of oil lamps during a power outage, a functioning CO detector is as essential as the lamp and the fuel itself.
Emergency Placement Strategies
The placement of a lamp is a matter of structural safety. It must be positioned on a stable, level, and non-flammable surface. A ceramic tile, a metal tray, or a stone countertop are suitable bases. Maintain a clear radius of at least one foot around the lamp, keeping it well away from curtains, loose papers, bedding, or any other combustible material. In a prepared household, it is wise to establish designated “lighting stations” in key areas—the main living area, the kitchen, a hallway. These stations can be pre-equipped with a stable base, a matchbox, and the fuel canister, creating a safe and efficient system for navigating a darkened home.
For a wick you can depend on when it matters most, the Product: Emergency-Ready Wick Kit includes five pre-sized wicks and a dedicated trimmer. Link: https://illuminationsupply.example/emergency-wick-kit-2025
Cleaning and Maintenance Rituals
The reliability of an oil lamp is not inherent; it is earned through a regimen of care. This maintenance is not merely a chore of cleaning, but a process of observation and adjustment, a dialogue between the user and the machine. A well-kept lamp operates with a cleaner flame, a brighter light, and a far greater degree of safety. The rituals can be divided into the frequent, almost unconscious acts performed with each use, and the more methodical, scheduled procedures that preserve the lamp’s integrity over months and years.
Regular Maintenance Schedule
Adherence to a simple schedule prevents the accumulation of problems. The most effective maintenance is the kind that addresses issues when they are small, before they can degrade the lamp’s function or safety.
Daily Cleaning Requirements
The single most important daily task involves the chimney. After each use, once the lamp has cooled completely but before it is stored away, wipe the interior of the glass chimney with a sheet of crumpled newspaper. The slight abrasiveness of the newsprint effectively removes the thin layer of soot and oil vapor residue while leaving no lint behind. As you wipe, visually inspect the glass for any localized, stubborn buildup of soot. Finally, make a habit of inspecting the very tip of the wick before striking a match. Look for a flat, even carbonized edge; a jagged or overly thick profile indicates it is time for a trim.
Monthly Deep Cleaning Protocol
Once a month, or after every thirty hours of cumulative burn time, a more thorough disassembly and cleaning is warranted. For the burner assembly itself, a paste made from baking soda and a small amount of water is an effective, non-abrasive cleaner. Apply it with a soft cloth or a small brush to dissolve oil film and carbon deposits. For metal parts with stubborn, caked-on residue—such as the burner cap or the wick riser mechanism—soaking them overnight in a mild solution of warm water and dish soap will loosen the grime. The most critical step following any cleaning involving moisture is to dry every component thoroughly with a soft cloth and allow them to air-dry completely before reassembling the lamp. Any residual moisture can cause corrosion or, in the case of the chimney, thermal shock and cracking.
Troubleshooting Common Maintenance Issues
When a lamp does not perform correctly, the symptoms almost always point to a specific, correctable cause. Learning to read these signs is part of the practice.
Addressing Soot and Residue
A black, smoky flame that deposits excessive soot on the chimney is the most common complaint. This is almost never a fault of the lamp, but of its adjustment. The primary cause is a wick that has been raised too high, creating a flame that is too large and fuel-rich for complete combustion. The secondary cause is the use of improper or low-quality fuel. To clean a heavily sooted chimney, use lukewarm water and a few drops of a mild, non-ammoniated detergent. Rinse and dry it meticulously. It is a fundamental rule of safety to never light a lamp with a damp or wet chimney, as the sudden, uneven heating will almost certainly cause the glass to crack.
Preventing and Fixing Fuel System Issues
A leak in the fuel system is a profound failure, rendering the lamp both useless and hazardous. During your monthly cleaning, make a regular inspection of the fuel reservoir’s seams and the base of the font for any signs of weeping or moisture. Check the integrity of the gasket or seal inside the fuel cap; these can deteriorate with age and exposure to fuel, leading to slow evaporation and a weakened flame. If the fuel control valve becomes stiff or difficult to adjust, it may be gummed up with old fuel residue. A careful cleaning with a solvent appropriate for the metal—often isopropyl alcohol for brass—can restore its smooth operation.
For a maintenance kit designed specifically for this purpose, the Product: Chimney & Wick Care Set includes a non-abrasive glass cleaning tool, a brass wick trimmer, and a year’s supply of replacement cap seals. Link: https://illuminationsupply.example/chimney-wick-care-set-2025
Safety Protocols You Can’t Ignore
The light an oil lamp provides is a direct result of a controlled combustion process, a contained fire. The protocols governing its use are not mere suggestions; they are the physical principles that separate a useful tool from a domestic hazard. Safety is not an accessory to the lamp but an integral part of its operation, a discipline that must be practiced with the same consistency as cleaning the chimney or trimming the wick. This discipline is built on two pillars: the management of the environment in which the lamp burns, and the handling of the fuel that powers it.
Indoor Use Safety Measures
Using a flame indoors requires a specific awareness of the surrounding space. The goal is to integrate the lamp into your environment without allowing the environment to become a threat to the lamp, or the lamp a threat to the environment.
Ventilation Requirements
A common misconception is that a lamp burning “clean” fuel does not require ventilation. This is false. All combustion, regardless of fuel quality, consumes oxygen and produces carbon dioxide. In a tightly sealed room, this can gradually deplete the available oxygen, leading to incomplete combustion and the production of carbon monoxide, an odorless and dangerous gas. Therefore, it is imperative to maintain cross-ventilation. A window opened slightly at the top and bottom of a room creates a convective current that supplies fresh oxygen and exhausts combustion byproducts. Never use oil lamps in rooms that are hermetically sealed, such as a modern, airtight sauna or a small, windowless closet.
Fire Prevention Strategies
The three-foot radius around a lit oil lamp is a sacred perimeter. Within this circle, nothing flammable should reside: no curtains, no loose papers, no hanging textiles, no dried floral arrangements. The lamp itself must be placed on a stable, level, and non-combustible base, such as a ceramic tile or a solid wood table far from the edge, to prevent any possibility of tipping. The most critical rule, however, is one of attendance. A burning lamp must never be left unattended. If you leave the room, extinguish the flame. If you go to sleep, extinguish the flame. The lamp’s light is for your conscious enjoyment, not for illuminating an empty room.
Fuel Handling and Storage Safety
The fuel is the potential energy of the lamp, and its handling demands a respect for its volatility. The transition of fuel from the storage container to the lamp’s font is the most vulnerable point in the entire process.
Safe Refueling Practices
The ritual of refueling begins with confirmation that the flame is completely out and the entire lamp assembly has cooled to the touch. A hot font filled with liquid fuel is a recipe for vaporization and potential flare-up. Always use a funnel with a fine spout to guide the fuel into the font, preventing spills onto the lamp’s exterior or the surface beneath it. Should any fuel spill, however minor, you must treat it as a primary task. Immediately wipe it up with a rag, which should then be taken outside to air-dry, away from any ignition source, to prevent the buildup of combustible vapors indoors.
Child and Pet Safety Considerations
An oil lamp, whether lit or not, holds an inherent fascination for children and animals. Its light flickers, its shape can be intriguing, and its placement often seems like an invitation. It is the user’s responsibility to eliminate this curiosity through physical and educational barriers. Lamps and fuel should be stored in a locked cabinet or on a high shelf, utterly out of reach. When a lamp is in use, establish a clear “no-go zone” that children and pets are taught not to enter. This is not merely about issuing a command; it is about explaining, in age-appropriate terms, that the lamp is hot and can cause a “boo-boo” or a fire. This education transforms a simple rule into a understood principle.
For a safety-focused solution, the Product: StableBase Non-Slip Lamp Mat is crafted from a fire-resistant silicone material that grips both the lamp and the table surface, significantly reducing tipping risks. Link: https://illuminationsupply.example/stablebase-lamp-mat-2025
Mastering the Flame: Your Path to Perfect Illumination
Achieving a clean, bright, and safe flame is the direct result of understanding and applying the principles of proper wick care. We’ve explored the critical science of capillary action, the non-negotiable practice of pre-lighting trimming, and the importance of matching wick type and width to your specific lamp and fuel. Selecting the correct fuel, whether odorless liquid paraffin for indoor use or kerosene for well-ventilated spaces, is equally vital for performance and safety. Finally, a disciplined approach to regular cleaning, safe refueling, and ensuring adequate ventilation forms the foundation of responsible lamp ownership.
By integrating these practices, you elevate lamp maintenance from a simple chore to a skilled ritual, guaranteeing reliability and maximizing the lifespan of your equipment. The quality of your light is a direct reflection of the care you invest.
Ready to put this knowledge into practice with components designed for excellence? Share your own wick maintenance tips in the comments below and visit our curated selection of high-performance wicks and safety accessories to ensure your lamp operates flawlessly.


